Arviticket is a cashless-event payment platform. Attendees carry an NFC token (a wristband, card, or tag) that holds a prepaid cash balance. They top the token up, then simply tap it to pay for food, drinks, and goods at vendor POS devices.
This guide is the training reference for the three groups who operate the system:
-
POS operators / cashiers — the staff on the Android POS device who take payments and load credit onto tokens. See POS operator guide.
-
Event managers — the people who set up events, vendors, menus, and tokens in the web console and run the reports. See Event manager guide.
-
Cardholders — the attendees themselves, using the self-service web portal to check their balance and top up online. See Cardholder guide.
Start with Core concepts for the shared vocabulary, then jump to the guide for your role. Each guide is task-oriented: it walks through what you do, step by step, with a screenshot of every screen.
1. Core concepts
Before using any part of Arviticket, it helps to understand how money moves through the system and what the key terms mean. Everyone — cashiers, managers, and cardholders — shares this vocabulary.
1.1. How the money flows
At the centre of Arviticket is the token: an NFC wristband, card, or tag that an attendee carries. The token stores a cash balance directly on its chip, so the POS device can read and update it even with no internet connection.
The typical journey looks like this:
-
Top up — the attendee adds credit to their token, either at a cashier desk (cash or card) or online through a payment provider. The balance on the token goes up.
-
Tap to pay — at a vendor’s POS device, the attendee taps their token to buy items. The sale amount is deducted and the new, lower balance is written back to the token.
-
Cash out — at the end, any unspent balance can be returned to the attendee. This is simply a "negative top-up": the balance on the token goes back down to zero.
Everything happens offline on the POS device and is synced to the server in the background when a connection is available. Reports, balances, and settlement between the organiser and its vendors all draw on that synced data.
| Because the authoritative balance lives on the token, a cashier should never restart a POS device in the middle of an NFC write. See the operator guide’s failure-handling section for why. |
Online and manual credit
Sometimes a top-up is created away from the POS device — an attendee pays online, or a manager grants a manual credit in the web console. That credit is held on the server as a pending token credit and moves through three states:
| State | Meaning |
|---|---|
|
The credit has been created (e.g. online payment received) but not yet loaded onto a physical token. |
|
A POS device has picked the credit up and is loading it onto the token. |
|
The credit has been written to the token. The balance now reflects it. |
At the POS device the cashier uses Fetch Token Credit to pull a pending credit down and
write it onto the attendee’s token. (A credit can also end up CANCELLED or FAILED.)
1.2. The organiser hierarchy
Everything in Arviticket belongs to an Event Organiser — the top-level customer (for example, a festival company). The structure nests like this:
| Level | What it is |
|---|---|
Event Organiser |
The tenant/client. Owns events, vendors, menus, tokens, and the reusable configuration lists. Carries the billing arrangement with the platform. |
Event |
A single dated occasion run by an organiser. Controls whether tokens need a PIN, whether the attendee is charged for the physical tag, commission, online payments, and the cashier PIN. |
Vendor |
A merchant or stall (for example, a specific bar). |
Event-Vendor |
The link that places a vendor into an event. This is where a vendor is given its menu, a vendor code (used to set up the POS device), and the payment options (sales types, top-up types, discounts) for that event. |
1.3. Glossary
| Term | Meaning |
|---|---|
Token (a.k.a. ticket, tag, wristband) |
The attendee’s NFC device. Stores a cash balance on its chip. Read and written on every sale, top-up, cash-out, and balance check. |
Balance / Credit |
The money currently loaded on a token. |
Top-Up |
Adding credit to a token. |
Cash-Out |
Returning unspent credit from a token (a negative top-up). |
Manual Credit / Online Credit |
A top-up created centrally (by a manager or an online payment) and later written to the token at the POS device via Fetch Token Credit. |
Sale |
A purchase paid for from a token’s balance (or by cash), made up of line items. |
Sales Type (a.k.a. payment method) |
How a sale was paid — for example TOKEN (from the chip balance) or CASH. |
Top-Up Type |
How a top-up was funded — for example CASH or CARD. A separate dimension from the sales type, used only for top-ups and cash-outs. |
Discount |
A named percentage reduction that a cashier can apply at checkout. |
Member |
A registered token holder with a name and a status (Active / In-Active). Shown on balance checks. |
Commission / Billing |
The platform’s charge to the organiser (a percentage or a fixed amount per transaction). Some events also pass a commission on to the attendee at top-up. |
Cashier |
A top-up / cash-out desk, protected by an event cashier PIN, as distinct from a selling vendor. |
Payment Provider |
An external gateway used for online top-ups — PayNow, Omari, or EcoCash. |
MSISDN |
The attendee’s mobile phone number, used to identify them for online / mobile-money top-ups. |
POS device |
The Android handheld a cashier operates. Works offline and syncs to the server. |
2. POS operator guide
This guide is for cashiers and operators using the Arviticket Android POS device (the app shows as "Arvuti NFC-POS" on screen). It covers everything you do during an event: setting the device up, selling from the menu, taking payment, loading and returning credit, checking balances, and printing receipts.
The POS device works offline. Sales are stored on the device and uploaded to the server in the background, so you can keep serving even if the connection drops.
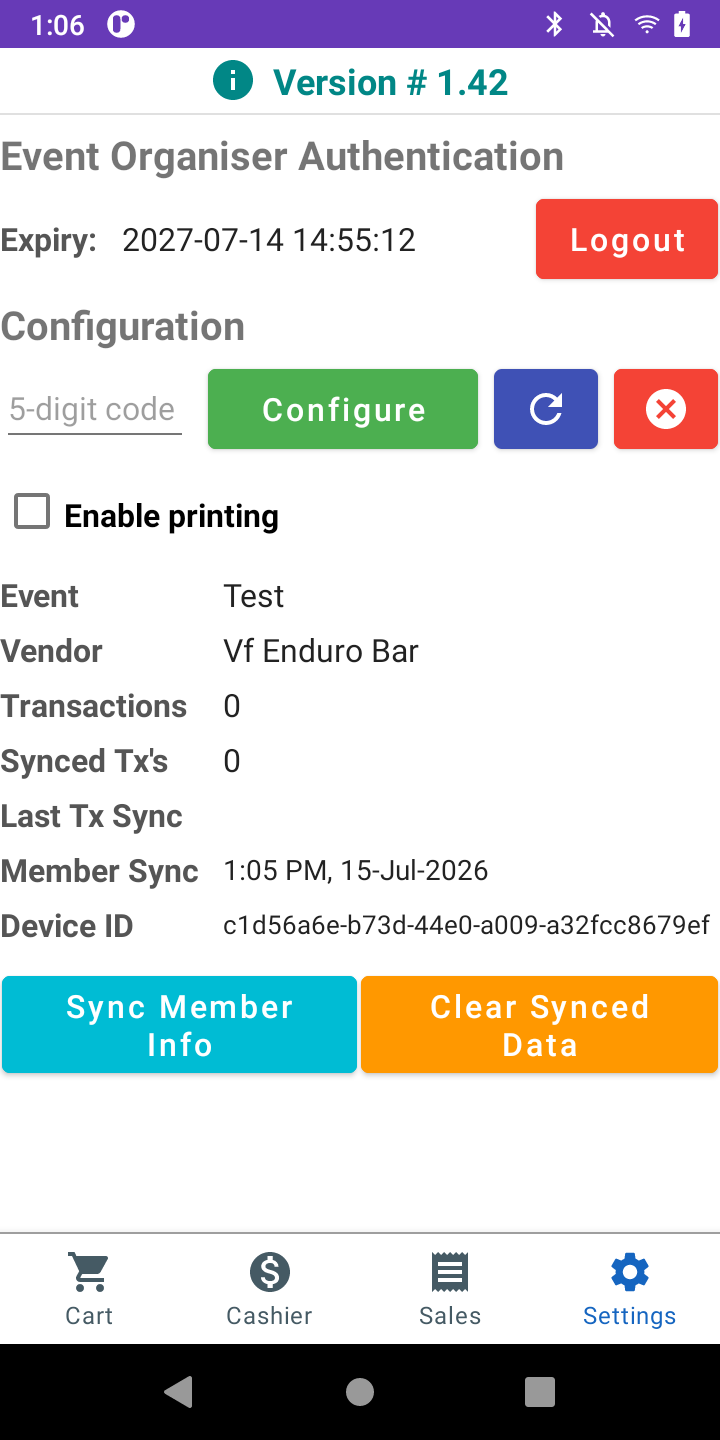
2.1. Getting started: log in and set up the device
Open the Settings tab (the gear icon, bottom-right of the screen).
Log in
-
If the device is not yet authenticated, Settings shows a username and password form.
-
Enter your operator username and password and tap Authenticate.
-
Once logged in, the form is replaced by a token-expiry line and a Logout button, and the configuration controls appear below.
Configure the device to your event and vendor
-
In the Vendor code field, type the 5-character code given to you for your stall.
-
Tap Configure. The POS device downloads the event settings and the full menu for that vendor and stores them on the device.
-
Use Reload Configuration at any time to re-pull the latest menu and settings (for example after a manager changes prices).
| Changing to a different vendor code wipes the local sales on the device and restarts the sale numbering. Only change the code when you intend to re-purpose the POS device. |
Check status before you start (and before you finish)
Settings shows read-only status you should glance at regularly:
-
Event and Vendor names — confirm the POS device is set up for the right stall.
-
Last Sync and Last Member Sync times.
-
Transaction Count and Synced Transaction Count — these two should match when all data has reached the server.
Other operator controls:
-
Enable Printing — turns the built-in Bluetooth receipt printer on or off.
-
Member Sync — manually pull the latest member list from the server.
-
Clear Synced Data — removes already-uploaded transactions from the device.
-
Un-configure — removes the event setup from the device.
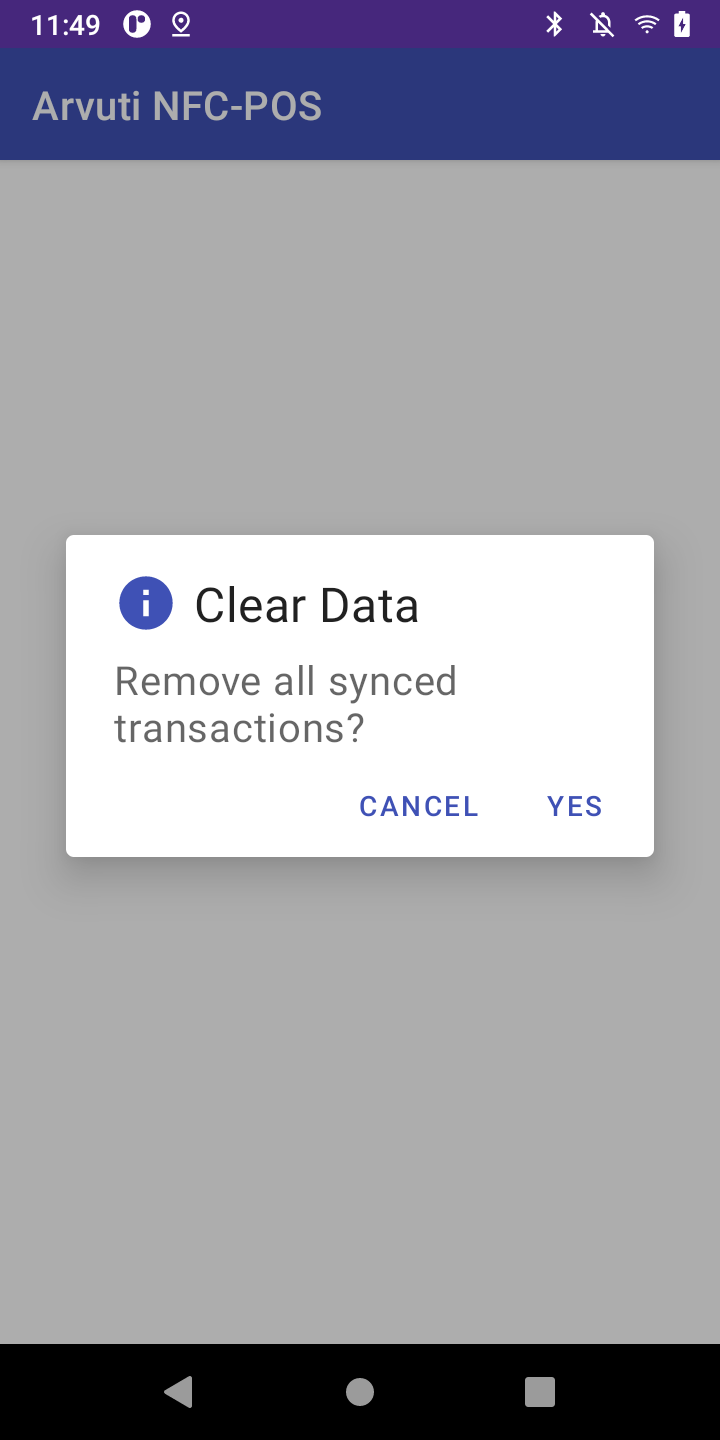
| Always sync before you clear or un-configure. Both Clear Synced Data and Un-configure are blocked while any transaction is still un-synced — check that Transaction Count equals Synced Transaction Count first, so no sales are lost. |
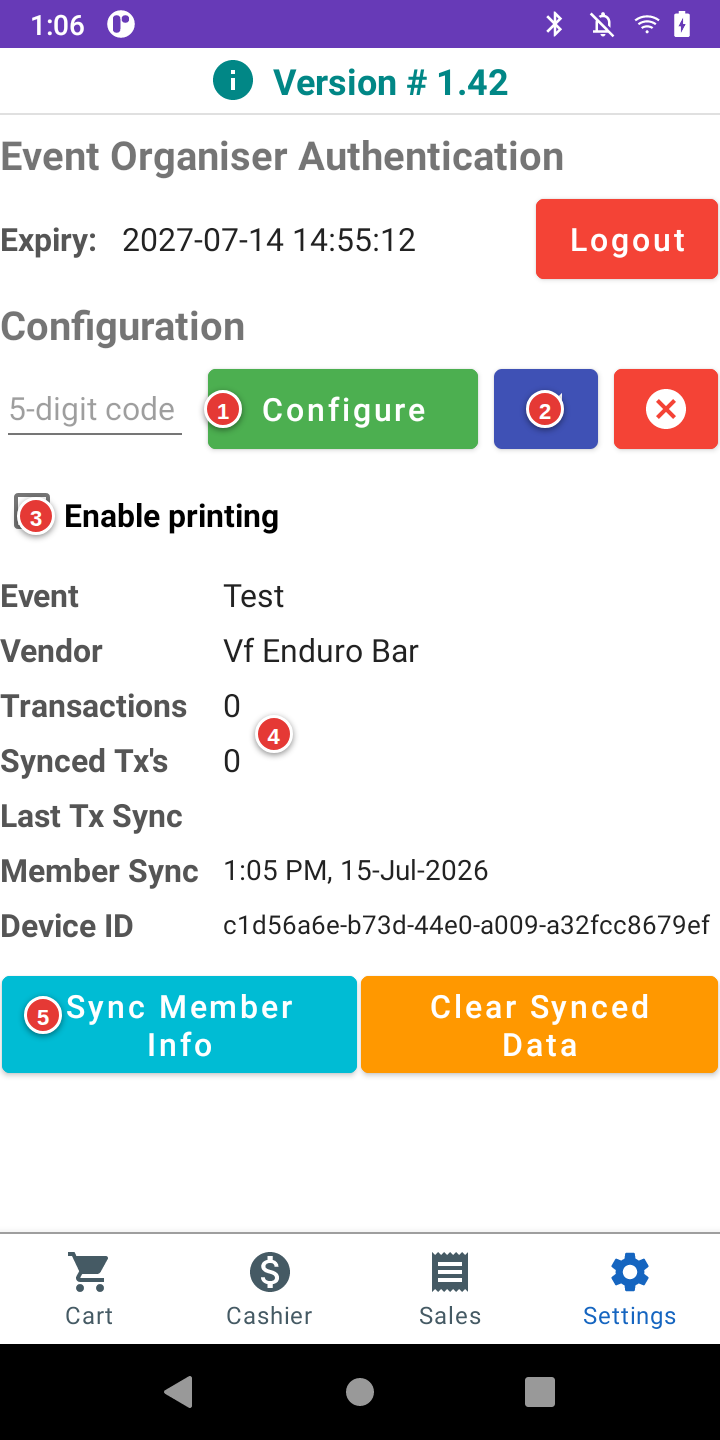
| # | Control |
|---|---|
1 |
Vendor code + Configure — type the 5-character code for your stall and tap Configure to pull the event settings and menu. |
2 |
Reload Configuration — re-pull the latest menu and settings (for example after a manager changes prices). |
3 |
Enable printing — turn the Bluetooth receipt printer on or off. |
4 |
Transactions vs Synced Tx’s — these two counts should match when every sale has reached the server. |
5 |
Sync Member Info — pull the latest member list from the server. |
2.2. The selling screen
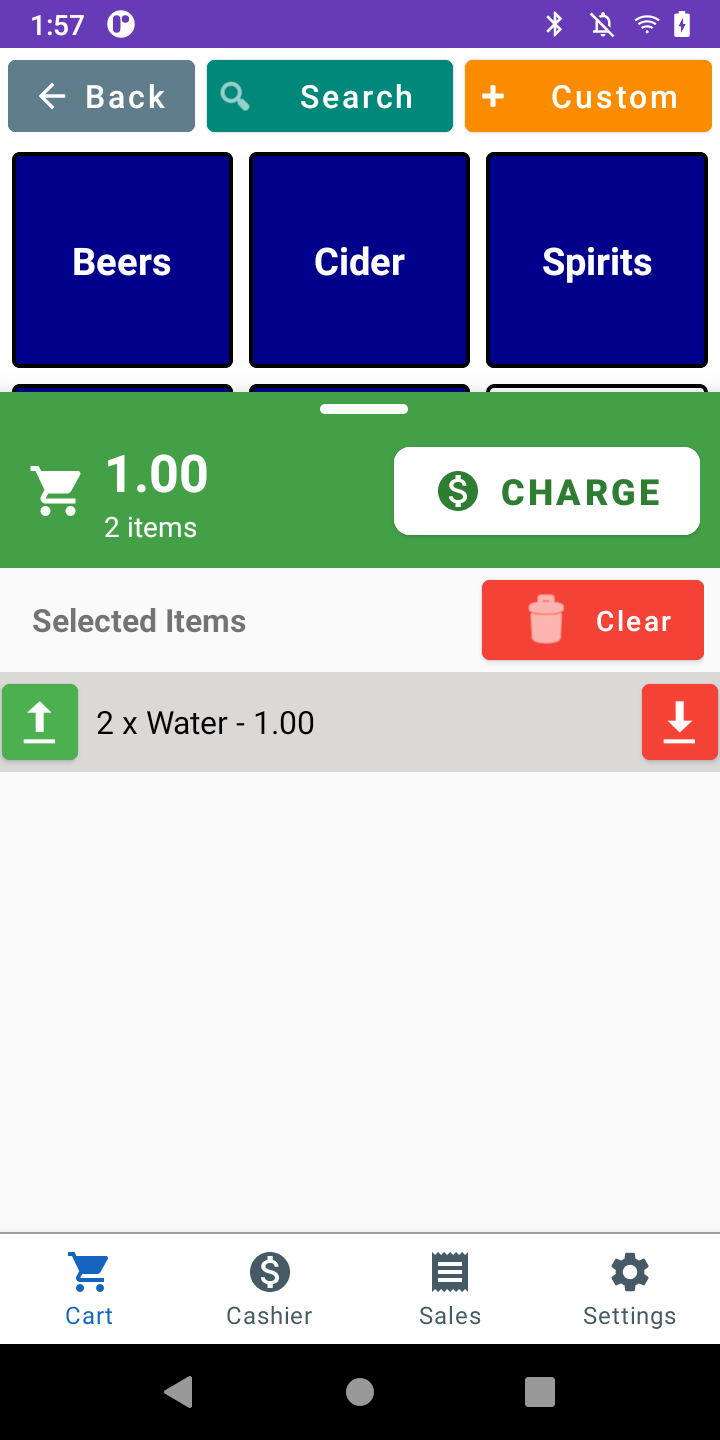
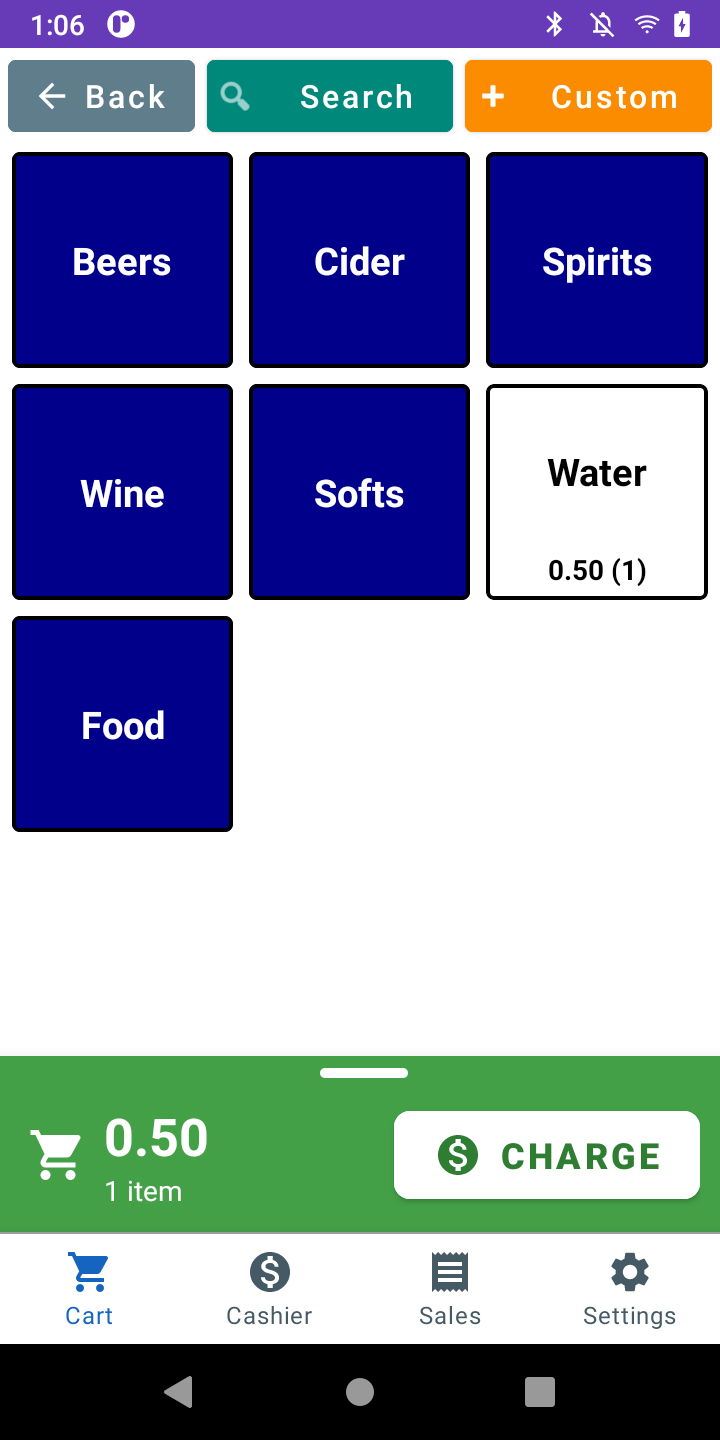
The Cart tab (shopping-cart icon) is the selling screen. It shows the vendor’s menu as a grid of tiles with a running-total cart strip pinned to the bottom.
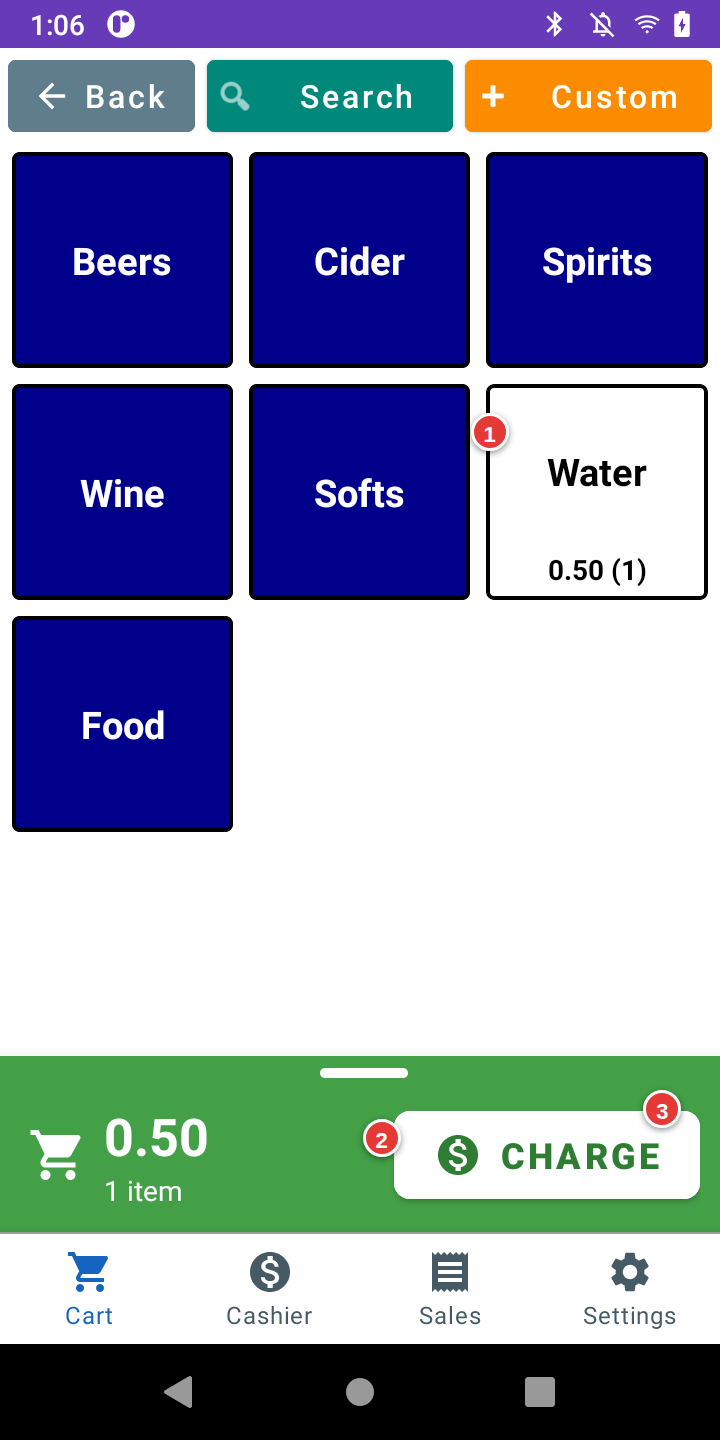
| # | Control |
|---|---|
1 |
Item tile — tap a priced tile (white, showing a price) to add one to the cart. Dark-blue tiles are folders you drill into. |
2 |
Running total — the cart strip shows the current total and item count. It is grey when empty and turns green as soon as the cart has items. |
3 |
Charge — start checkout for what’s in the cart. |
Navigating the menu
-
Priced item tiles (white, showing a price) — tap to add one to the cart.
-
Folder tiles (dark blue) — tap to drill into a sub-menu. A breadcrumb (for example ) shows where you are; use the Back button in the header to go up a level. Back is greyed out at the top level and red when you can go up.
-
Each item tile shows a live (n) count of how many are already in the cart.
The header row also has:
-
Search — filter items by name (useful for large menus).
-
Custom — add an item at an ad-hoc price (see Custom sales).
Entering a quantity
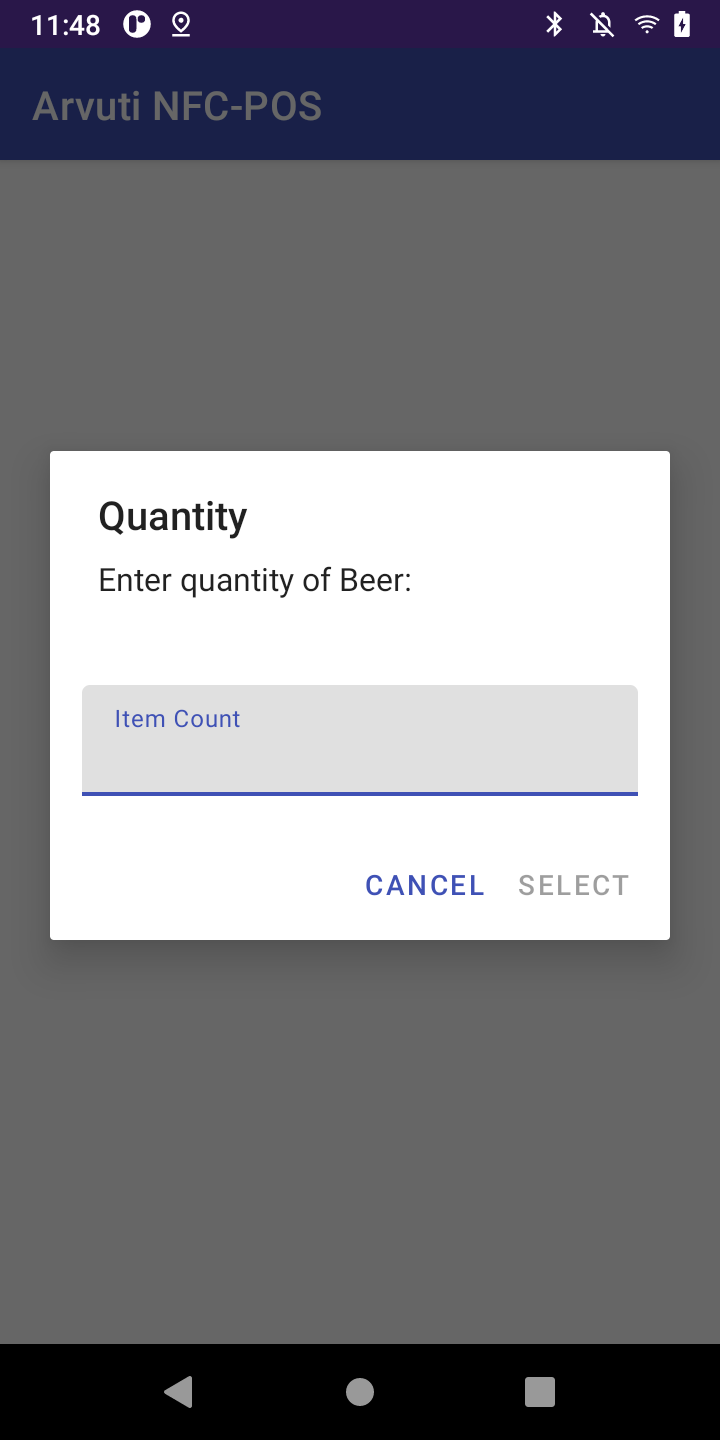
To add several of the same item at once, long-press the item tile and choose Enter quantity. A keypad dialog opens.
-
Type the number of items and tap Select.
-
The quantity must be a whole number greater than zero. If it is blank, zero, or not a number, the dialog shows an error and keeps the dialog open so you can correct it.
The cart strip
The bar at the bottom of the screen is the cart strip. Its collapsed "peek" is the running total.
-
It is muted grey when the cart is empty, and turns green the moment you add an item — so Charge stands out as the next action.
-
Tap the strip, or drag it up, to expand it. You then see each cart line with a green up arrow (add one) and a red down arrow (remove one) to adjust quantities, and a red Clear button to empty the cart.
-
Tap Charge to start checkout.
Custom sales
Tap Custom in the header to sell something at a price you type in (for example a one-off item not on the menu).
-
Type the amount directly on the keypad, or tap the quick-add tiles (+1 / +5 / +10 / +20 / +50 / +100) — each tile adds to the running total. Clear resets it.
-
Confirm to drop one custom line into the cart. You can add several custom lines and keep selling normally before charging.
2.3. Taking payment
When you tap Charge, the POS device walks through a short sequence.
-
Choose the payment method (only if more than one is set up for the event) — for example TOKEN (pay from the token’s chip balance) or CASH. If only one method is configured it is selected automatically.
-
Choose a discount (only if the event has discounts) — pick one, or "No Discount".
-
Then the flow depends on the method:
- Cash (or any non-token method)
-
A confirmation dialog shows the amount. Tap Confirm to record the sale. No token tap is needed.
- Token
-
If the event requires it, you are first asked for a PIN (you can be given the option to Skip PIN). Then the NFC scan dialog appears:
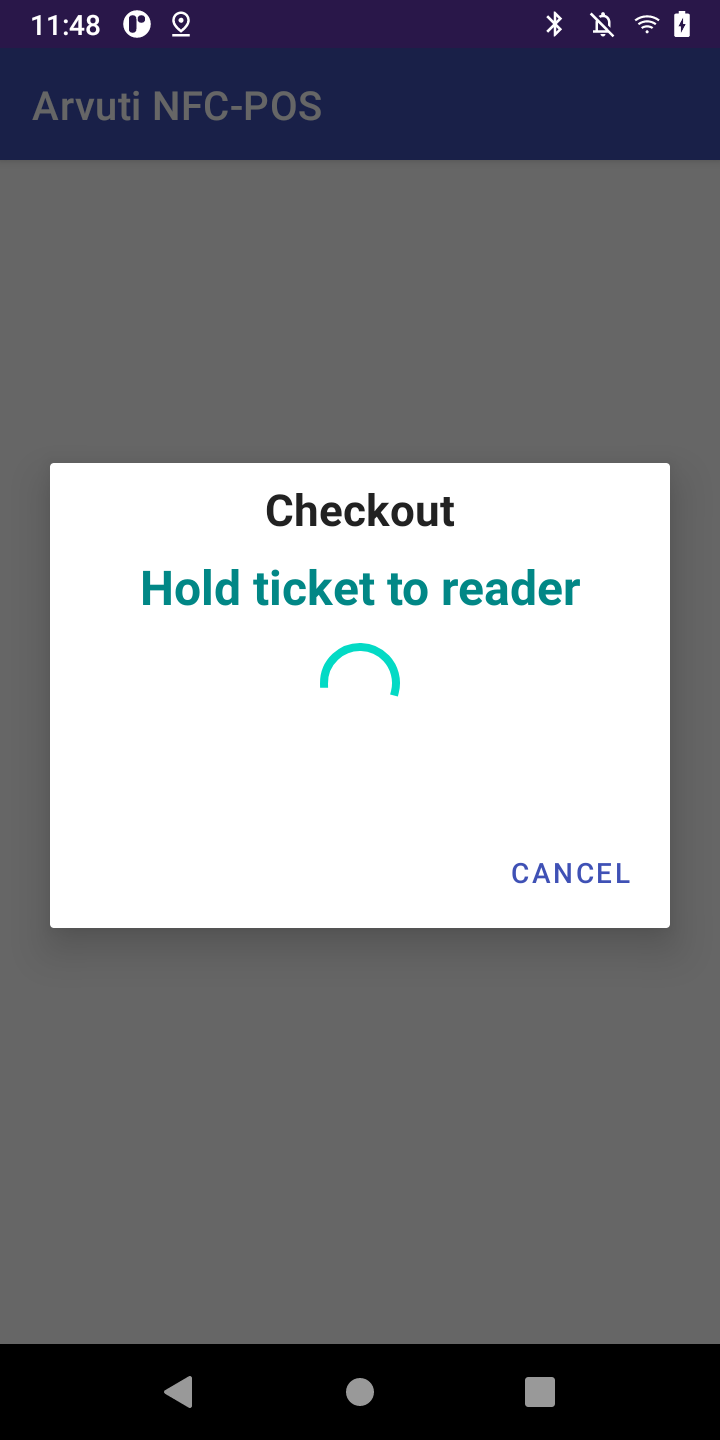 Figure 6. The customer taps their token to pay for a sale.
Ask the customer to hold their token to the reader. The POS device reads the token, checks it belongs to this event, verifies there is enough balance, deducts the amount, and writes the new balance back to the token.
A successful sale
On success you get a full-screen green result showing the amount charged.
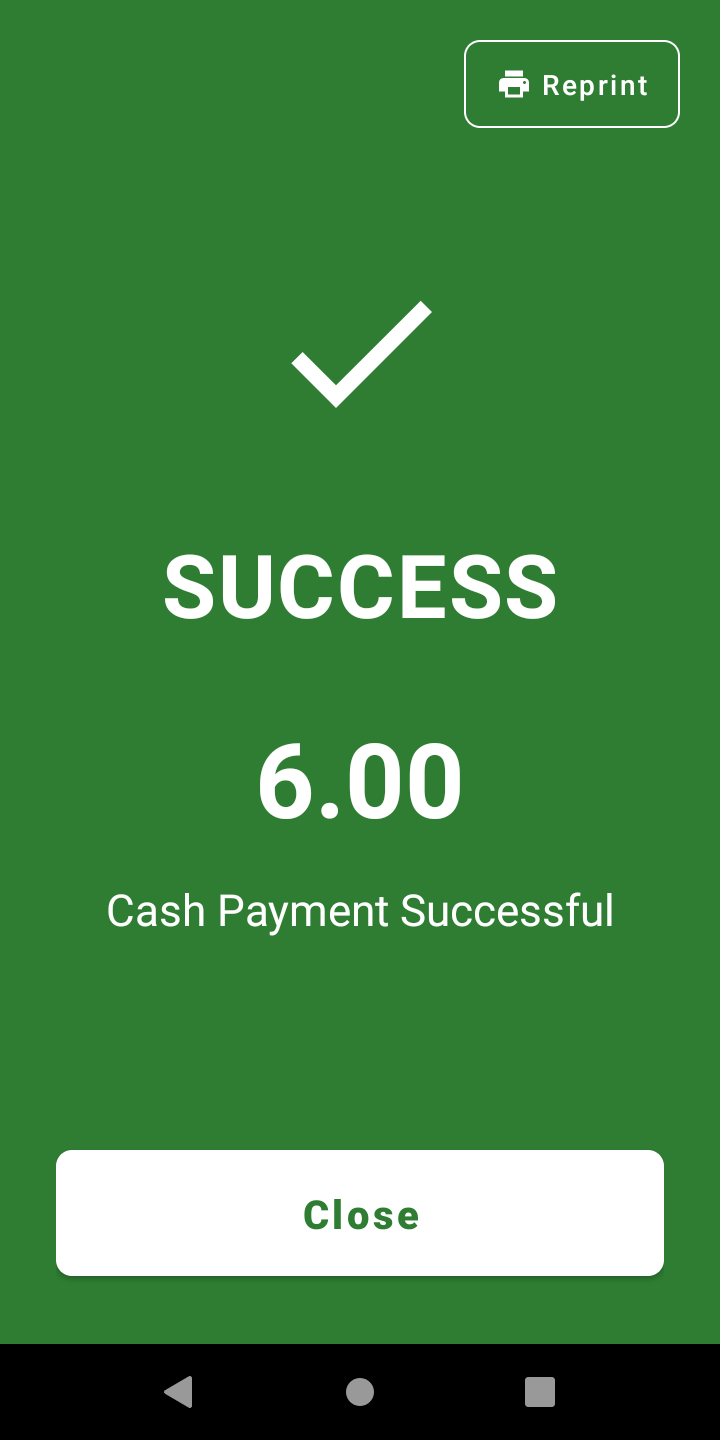
The Reprint button (top-right) reprints the receipt; Close returns to the menu, ready for the next customer.
2.4. Reading results and handling failures
A green screen means success. A red screen means the transaction did not go through. The headline tells you, in plain language, what to do.
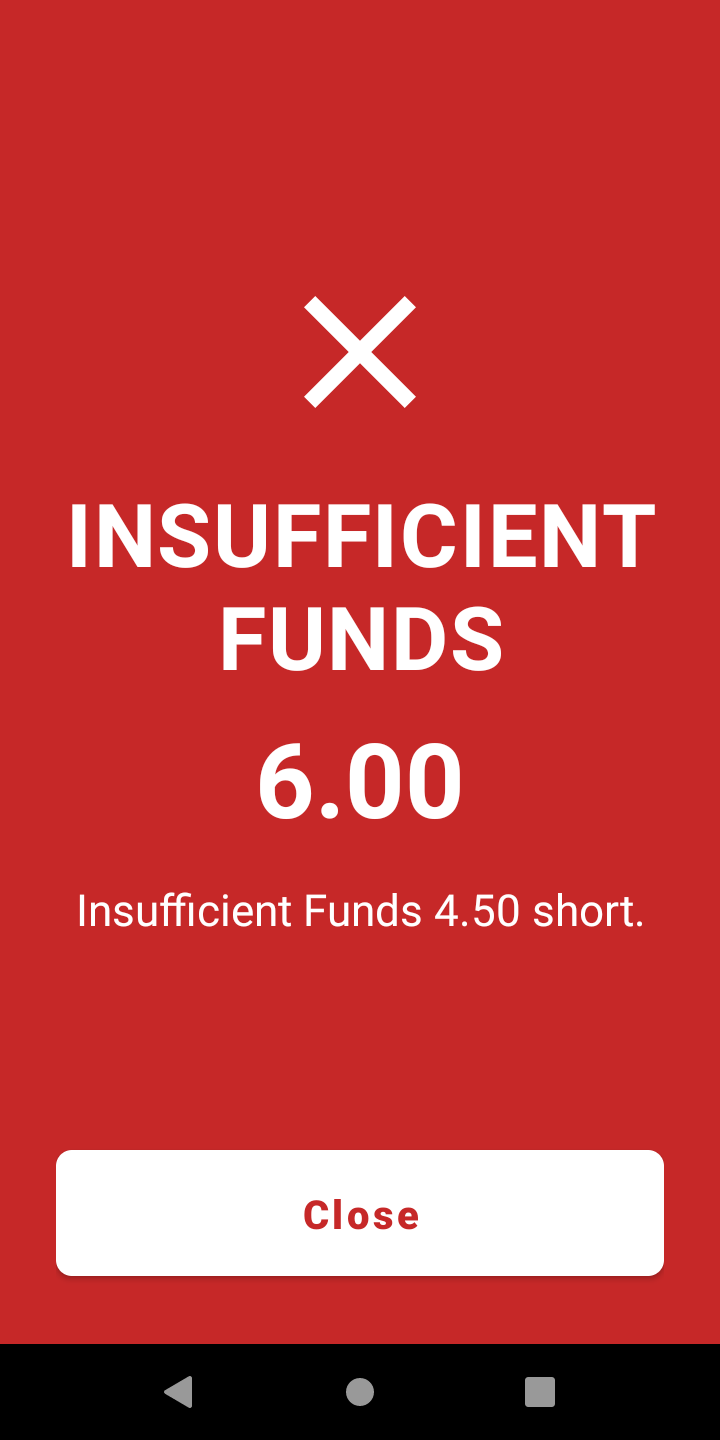
Common red screens and what they mean:
| Screen | What to do |
|---|---|
INSUFFICIENT FUNDS |
The token does not have enough balance. Ask the customer to top up, or reduce the order. (On a cash-out, close and enter a smaller amount.) |
WRONG EVENT |
The token was set up for a different event. Close and send the customer to the cashier. |
NOT SET UP |
The token is brand-new / not initialised for this event. Close and send the customer to the cashier to set it up. |
CHECK TICKET |
The reader couldn’t read the token. Present the token again — there’s no need to close the message first — making sure it is held flat against the reader. |
TRY AGAIN |
Something went wrong. Present the token again — there’s no need to close the message first. |
| You don’t have to tap Close before scanning again — the reader stays live while a red screen is showing. For a read error (CHECK TICKET, TRY AGAIN), just present the same token again to retry. The other red screens need a different action first (top up, a smaller amount, or send the customer to the cashier), so re-tapping the same token on its own won’t clear them. |
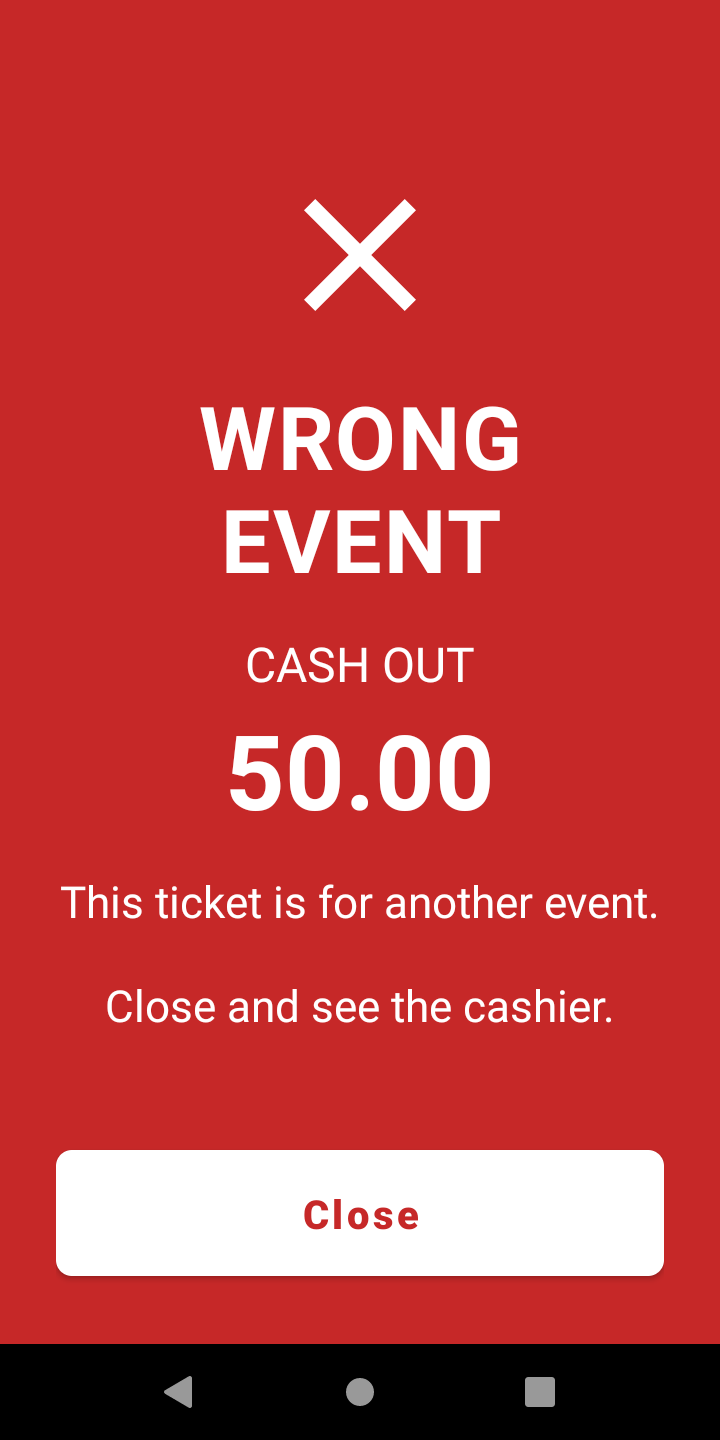
The "scan again" lock — do not restart the device
Occasionally a top-up or sale is interrupted mid-write (for example the customer pulls the token away too soon). To protect the balance on the chip, the scan dialog then locks Cancel behind a countdown and shows a warning.
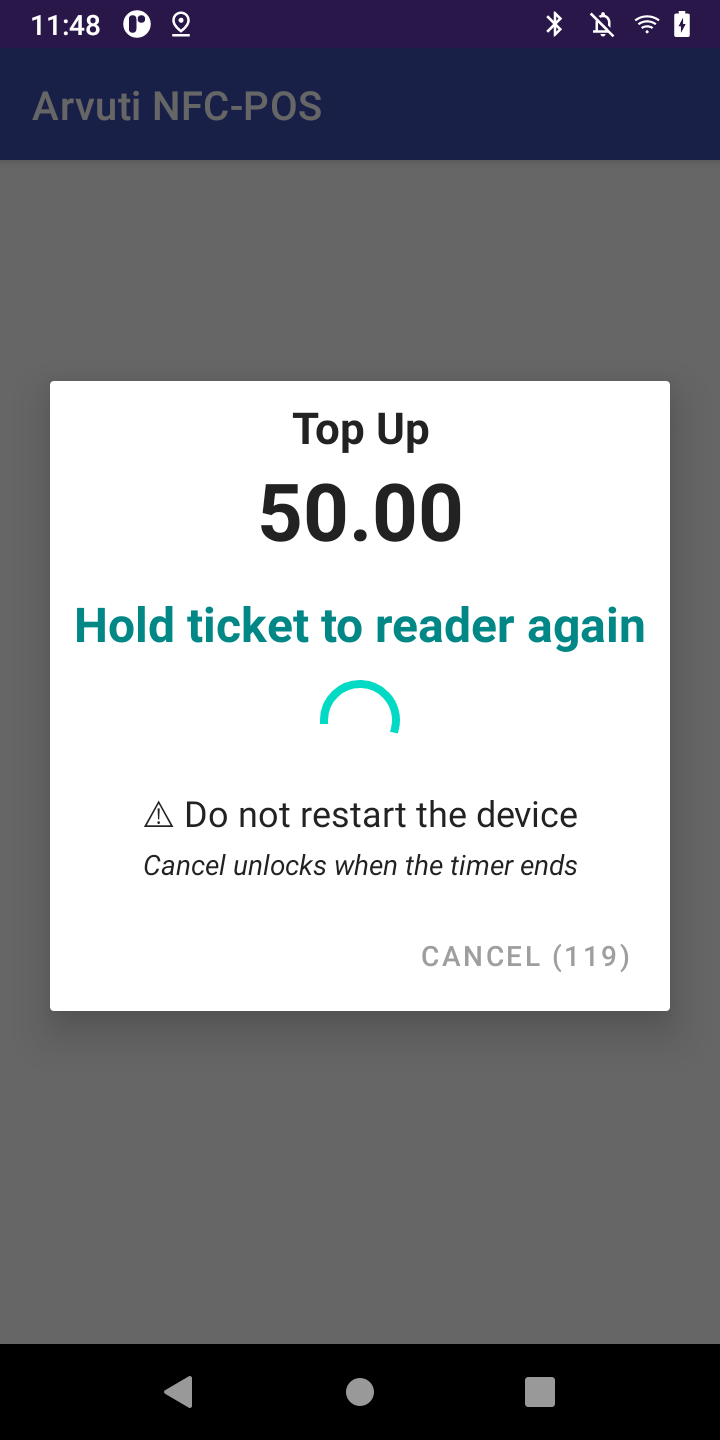
| When you see "Hold ticket to reader again" and "⚠ Do not restart the device", ask the customer to present the same token again and hold it steady until it succeeds. Do not close the app or restart the POS device — doing so during a half-written transaction can corrupt the token’s balance. |
2.5. Cashier: top up, cash out, and load online credit
The Cashier tab is where you add credit to tokens, return unspent credit, and load credit that a customer paid for online.
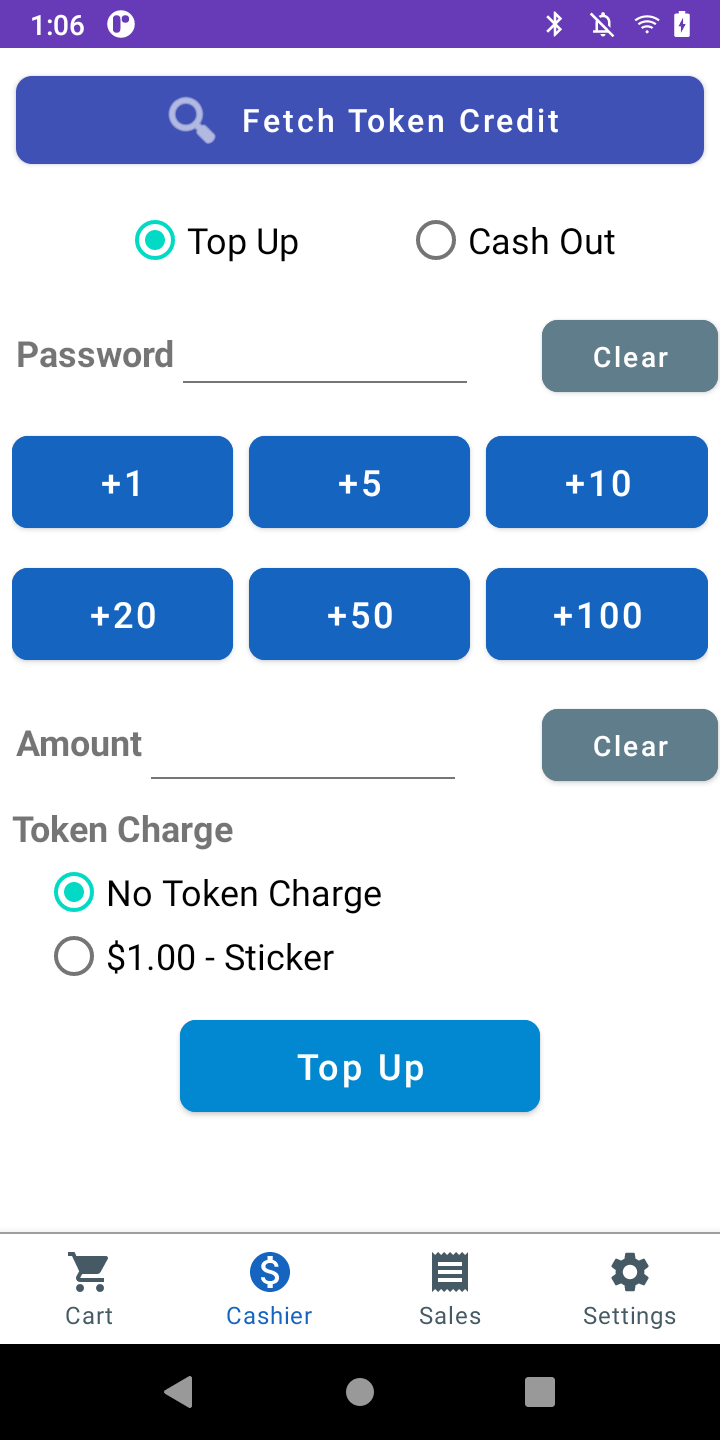
Every top-up and cash-out requires the event cashier PIN in the Password field.
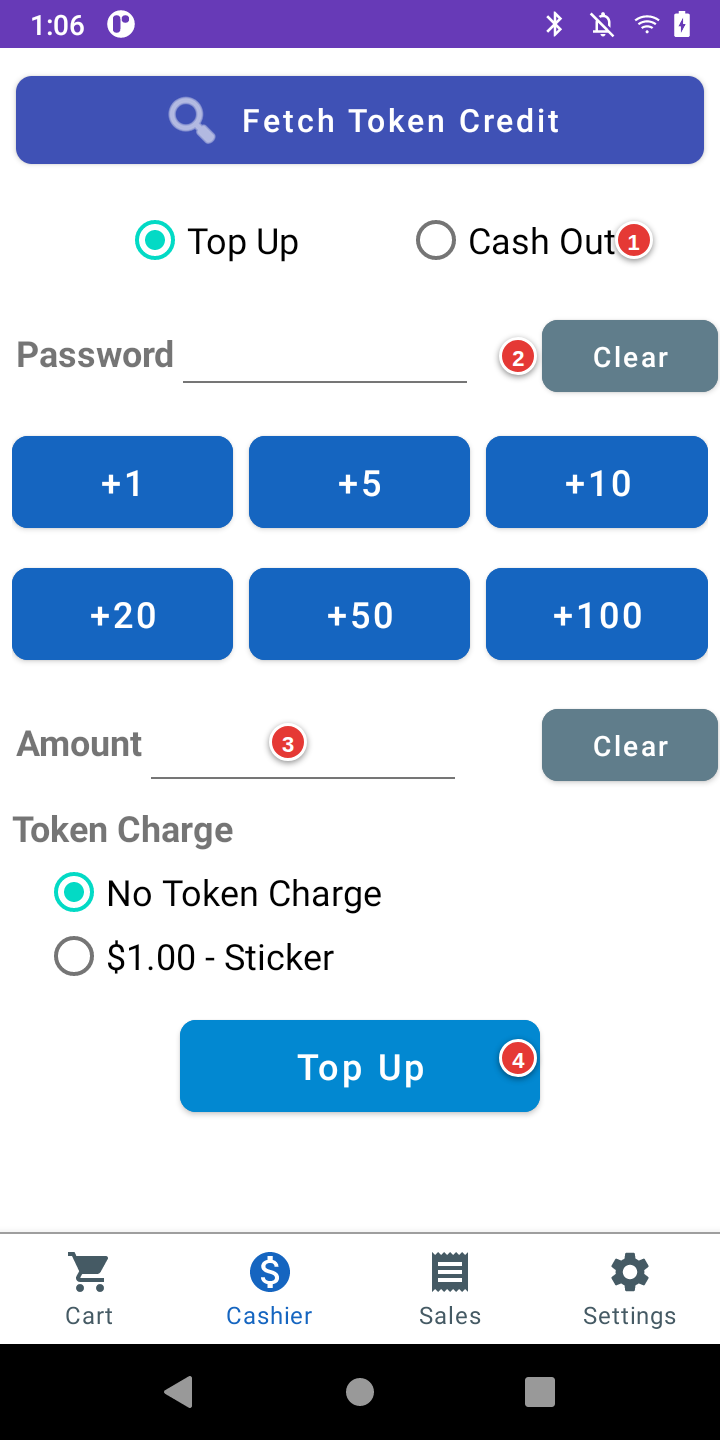
| # | Control |
|---|---|
1 |
Top Up / Cash Out — choose which you are doing. |
2 |
Password — the event cashier PIN. (Clear wipes the field.) |
3 |
Amount — type it directly, or tap the quick-add tiles above (+1 … +100); each tile adds to the running total. |
4 |
Top Up / Cash Out button — confirm, then have the customer tap their token. |
Top up a token
-
Make sure Top Up is selected.
-
Enter the cashier Password (PIN).
-
Set the amount: type it directly on the keypad, or tap the quick-add tiles (+1, +5, +10, +20, +50, +100) — each tile adds to the running total. Clear resets it.
-
If the event charges for a physical tag, choose a tag option under Token Charge (or "No Token Charge"). Its cost is added to the required amount.
-
Tap Top Up. If more than one top-up type is configured (for example CASH vs CARD), choose how the customer is paying.
-
The NFC dialog appears — ask the customer to hold their token to the reader.
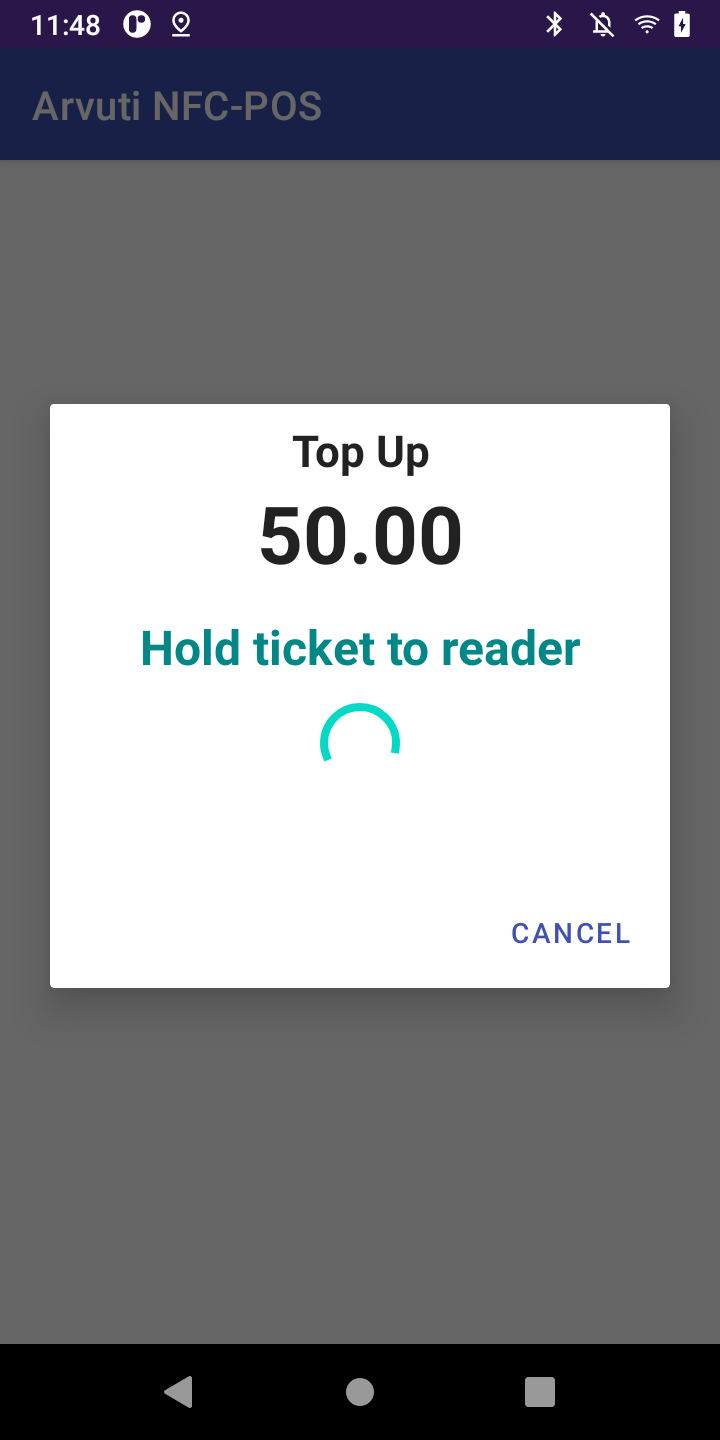
On success the green screen shows the amount added and the token’s new balance.
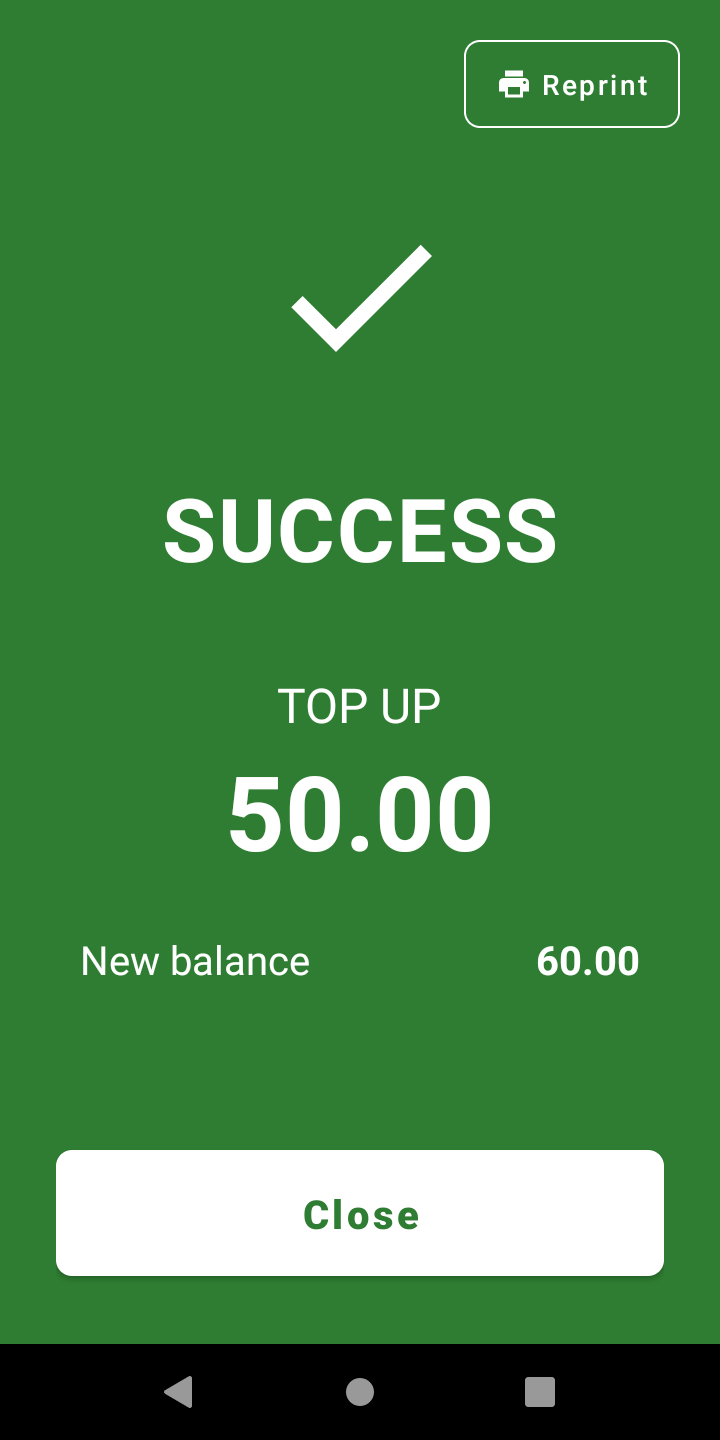
| If the event applies a commission charged to the customer, the top-up amount must cover the tag cost plus the commission. The POS device shows a helpful message if the amount is too low. |
Cash out a token
-
Switch the toggle to Cash Out.
-
Enter the cashier PIN, then set the amount to return: type it directly on the keypad, or tap the quick-add tiles (+1, +5, +10, +20, +50, +100). Clear resets it.
-
Tap Cash Out and have the customer tap their token.
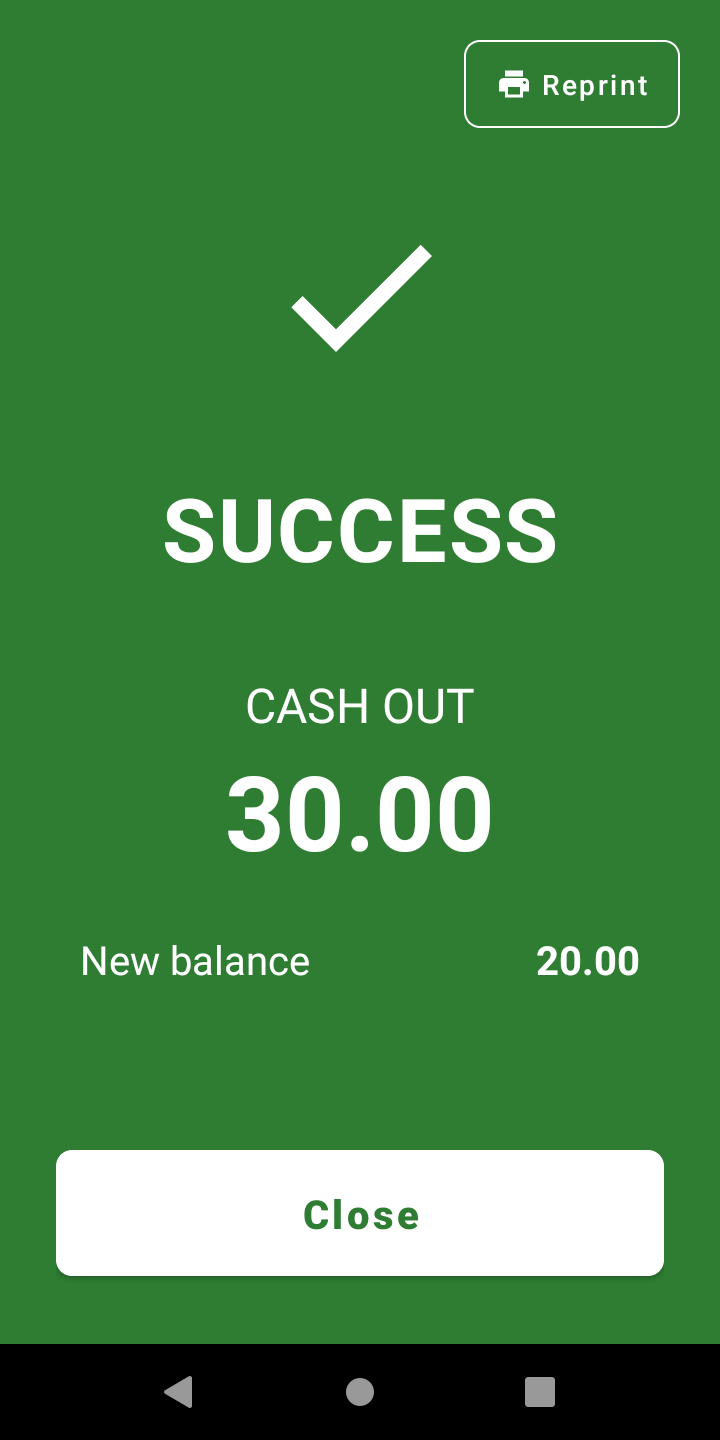
If you try to cash out more than the token holds, you get an INSUFFICIENT FUNDS screen telling you how much short it is — close and enter a smaller amount.
Fetch token credit (online top-ups)
If a customer paid for a top-up online, load it onto their token here.
-
Tap Fetch Token Credit.
-
Ask the customer to tap their token so the POS device can look up any pending credit.
-
If credit is found, the amount is pre-loaded as a Top Up; tap the same token again to write it onto the chip.
-
If there is nothing pending, you’ll see a "No Credit Pending" message.
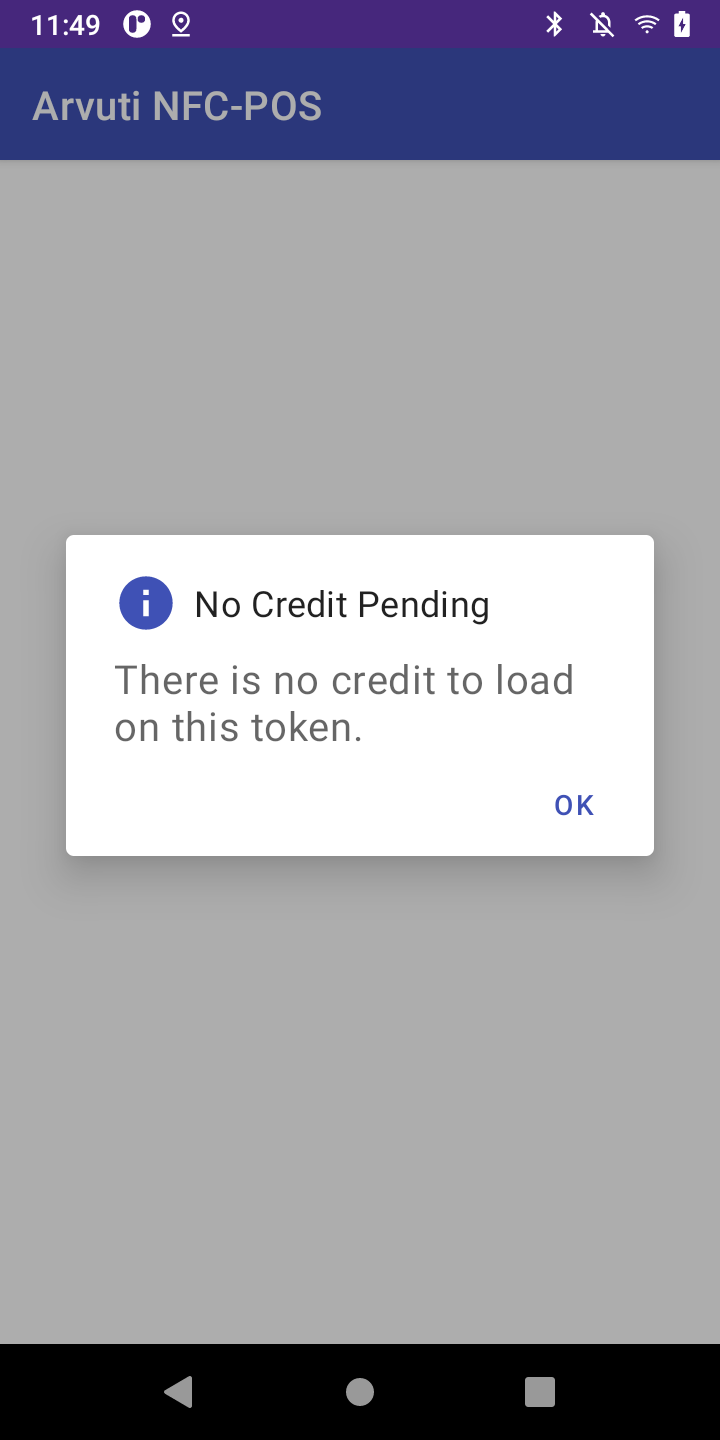
2.6. Checking a token’s balance
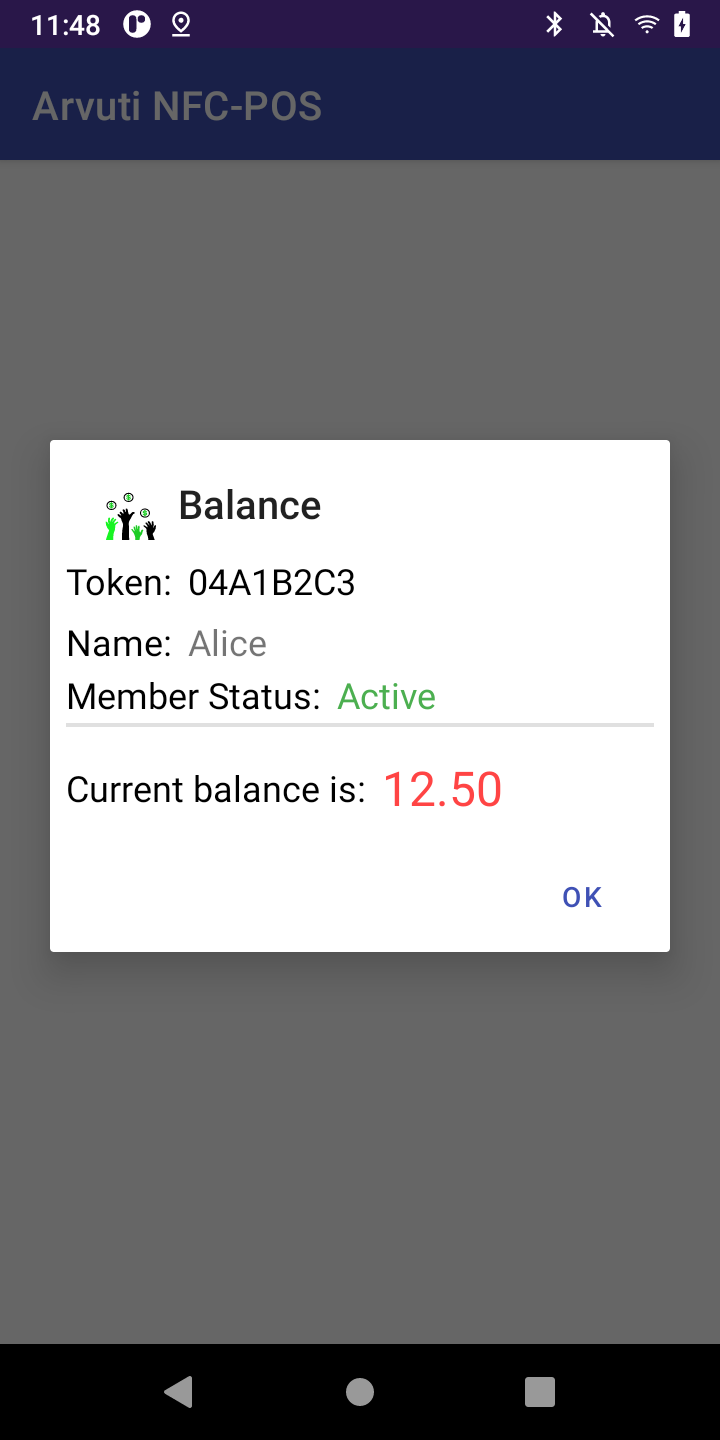
When no sale or top-up is in progress, simply tapping a token performs a balance check. This is read-only — it never changes the balance.
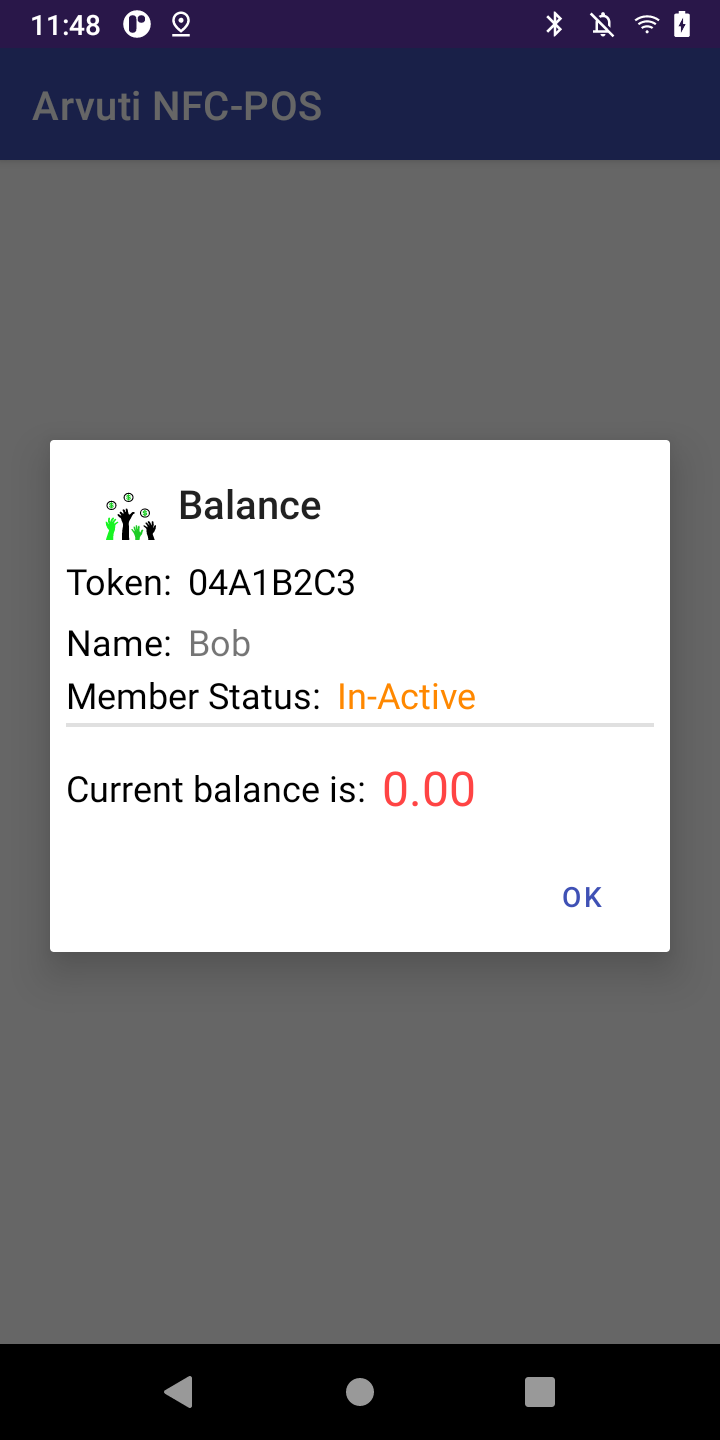
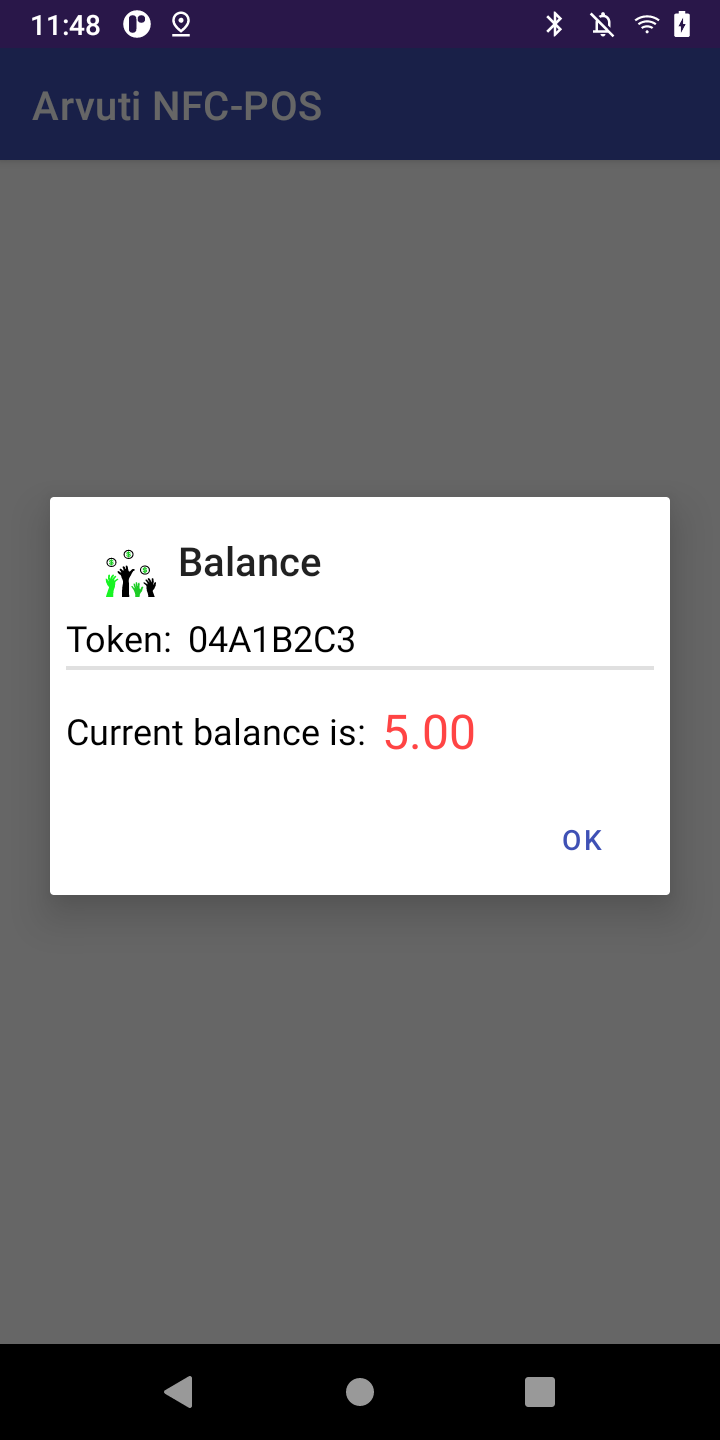
The dialog shows the token ID, the current balance, and, if the token belongs to a known member, the member’s Name and Member Status.
| Active member | In-Active member | Non-member |
|---|---|---|
|
|
|
A token that has been blocked shows a message telling you to see the event organiser.
2.7. Sales history and receipts
The Sales tab (receipt icon) lists the transactions made on this POS device.
-
Tap a transaction to reprint its receipt (you’ll be asked to confirm).
-
Print Sales Summary prints an end-of-day style summary — totals broken down by payment type and top-up type.
| Receipts and summaries only print if Enable Printing is switched on in Settings. |
2.8. Do’s and don’ts
Most of getting a clean, fast read comes down to how the token and the POS device are held. A few habits make almost all read failures go away:
|
Appendix A: The main tabs at a glance
A clean, badge-free reference of the three tabs you use most. The bottom navigation bar switches between them: Cart (sell), Cashier (top up / cash out), Sales (history), and Settings.
| Cart (selling) | Cashier | Settings |
|---|---|---|
|
|
|
3. Event manager guide
This guide is for event managers using the Arviticket web console ("Arvi Ticket"). It covers the day-to-day setup and reporting an organiser does before, during, and after an event: creating events, placing vendors, building menus, configuring payments and tokens, managing balances, and running reports.
Open the console in a web browser and sign in with your manager account. After login you land on the Reports screen.
3.1. Signing in and finding your way around
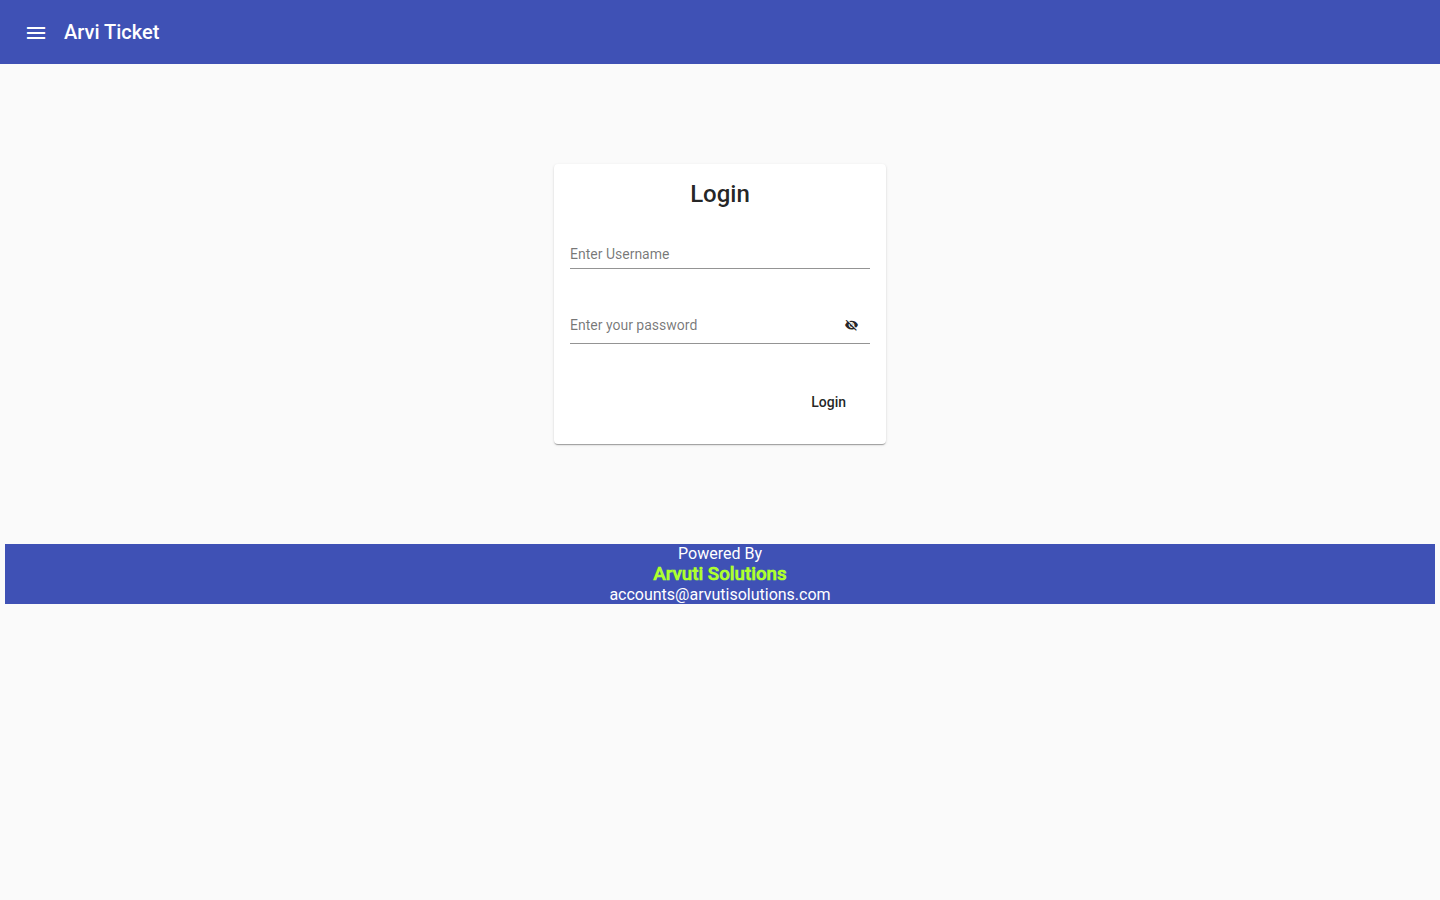
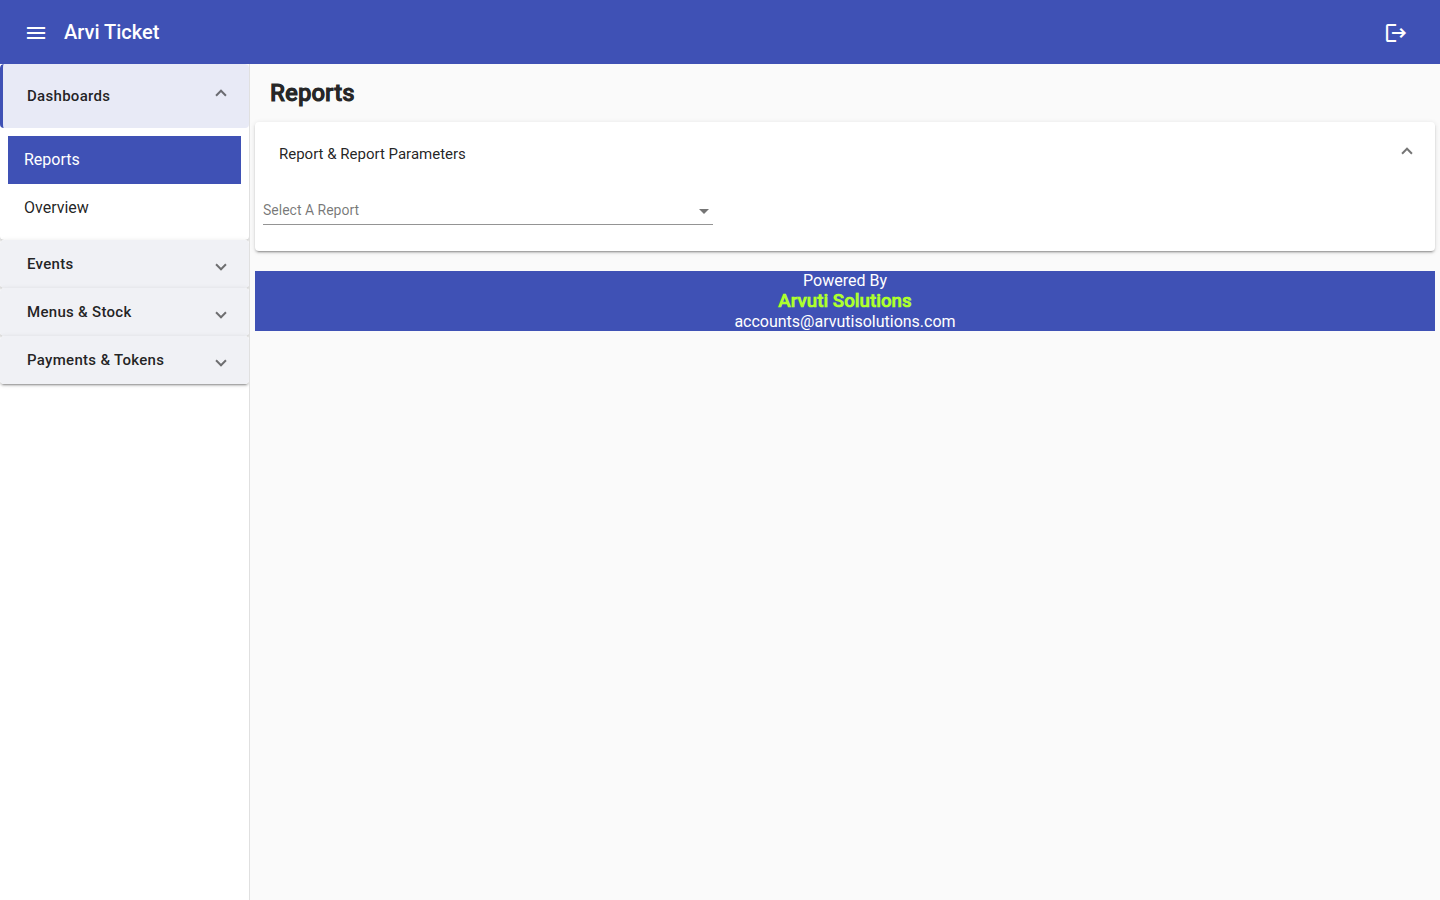
The left-hand sidebar groups everything into sections. As an event manager you see:
-
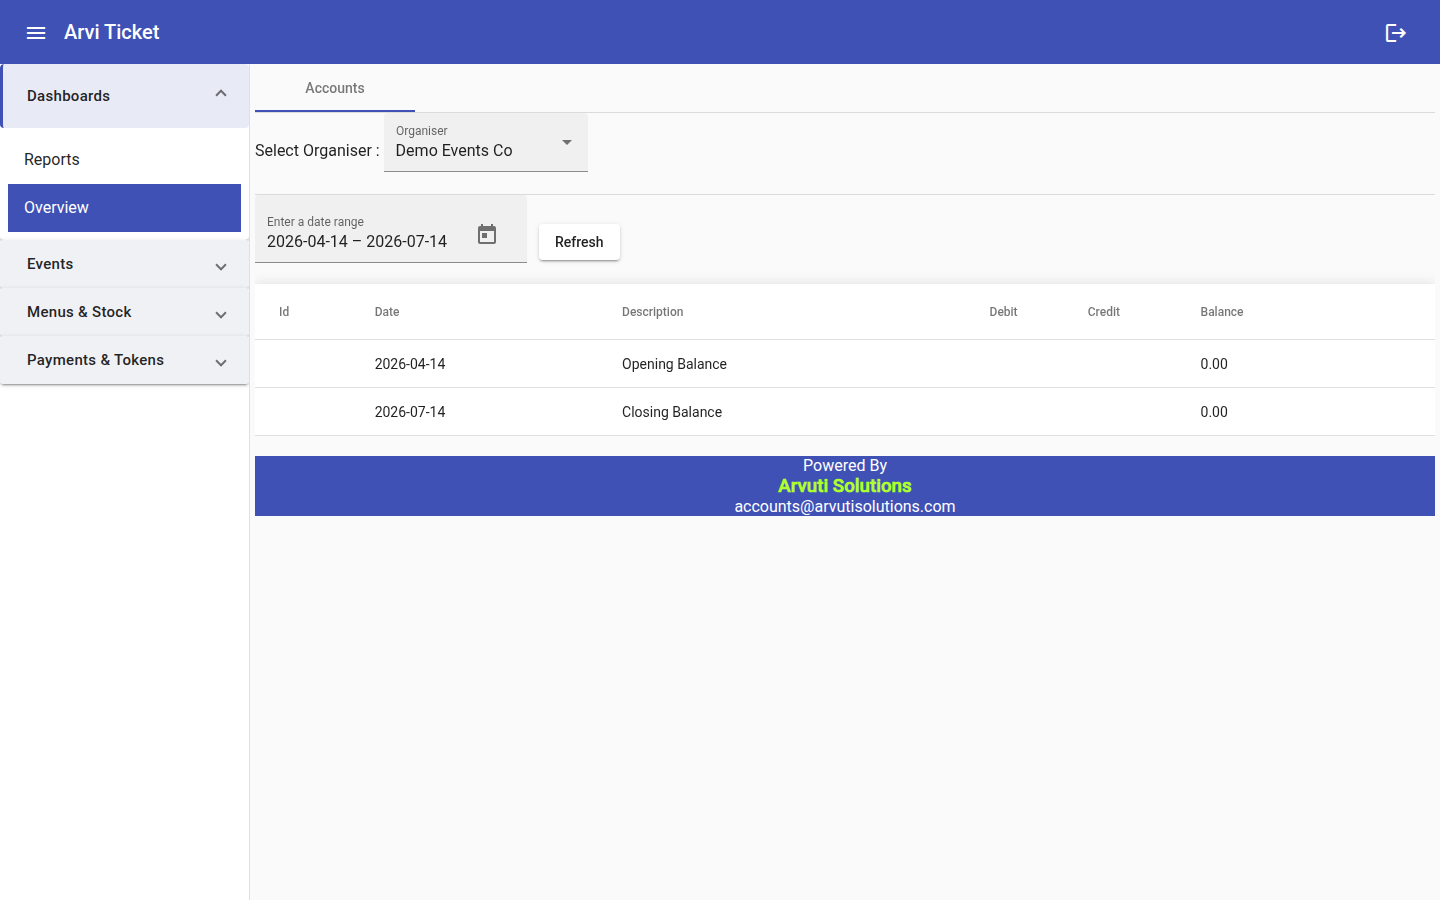
Dashboards — Reports and an Overview of your organiser’s account.
-
Events — Events, Vendors, Event Vendors, Event NFC Tags, Event Payment Providers.
-
Menus & Stock — Menus, Stock Items, Stock Transactions.
-
Payments & Tokens — Sales Types, Top Up Types, Payment Discounts, Registered Tokens, Token Top-Ups.
Every list screen shares the same toolbar: Create, View, Edit, and Delete buttons above a searchable, pageable table. Select a row first, then use View / Edit / Delete. Some screens add their own extra action buttons.
| Administrator-only areas (Users, Event Organisers, Devices, and Accounting) are not covered here and are not visible to event managers. |
3.2. Setting up an event
Open Events from the sidebar.
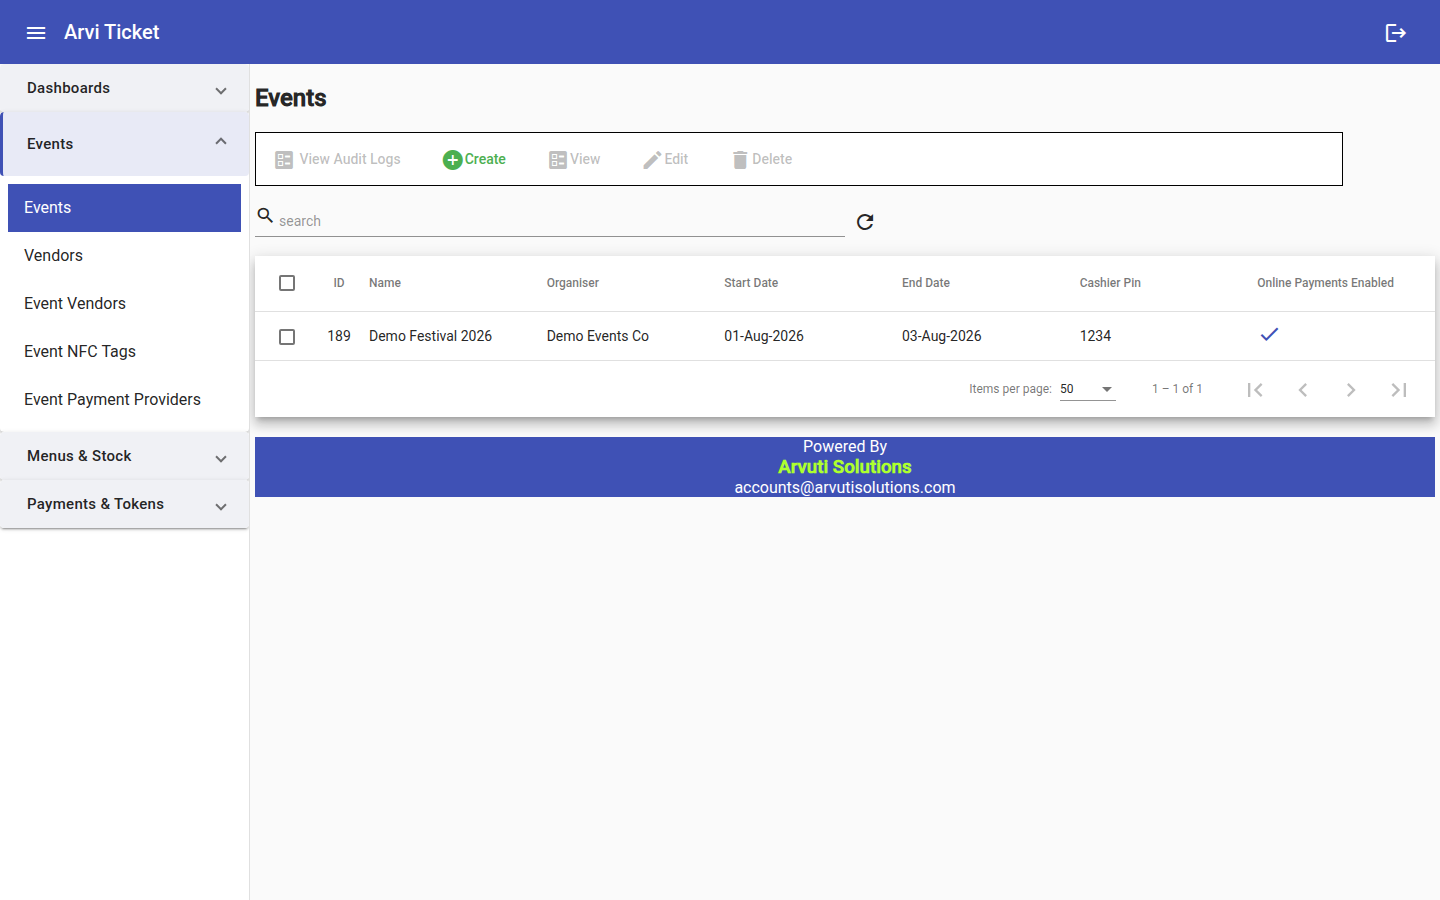
Click Create to add an event. The fields are:
| Field | What it does |
|---|---|
Event Organiser, Name, Start Date, End Date |
Basic identity and schedule of the event. |
Cashier Pin |
The PIN cashiers must enter on the POS device to top up or cash out. |
Token Authentication Required |
If on, token sales prompt for the customer’s PIN on the POS device. |
NFC Tag Charged To User |
If on, the attendee pays for the physical tag/wristband at top-up. |
Commission % Charged To User |
If on, the platform commission is passed on to the attendee at top-up (so the attendee’s top-up must cover it). |
Commission % Charge To User |
The commission rate itself. Entered as a fraction between 0 and 1 — |
Online Payments Enabled |
Allows attendees to top up online through a payment provider. |
Manual Credit Max |
The largest amount allowed on a single Manual Top-Up for this event. Blank or 0 means no limit. |
| Commission % Charge To User and Manual Credit Max are shown to you but are read-only — only an administrator can change them. The Commission % Charged To User switch itself you can set. (Watch the two similar names: the switch is "Charged To User", the rate is "Charge To User".) |
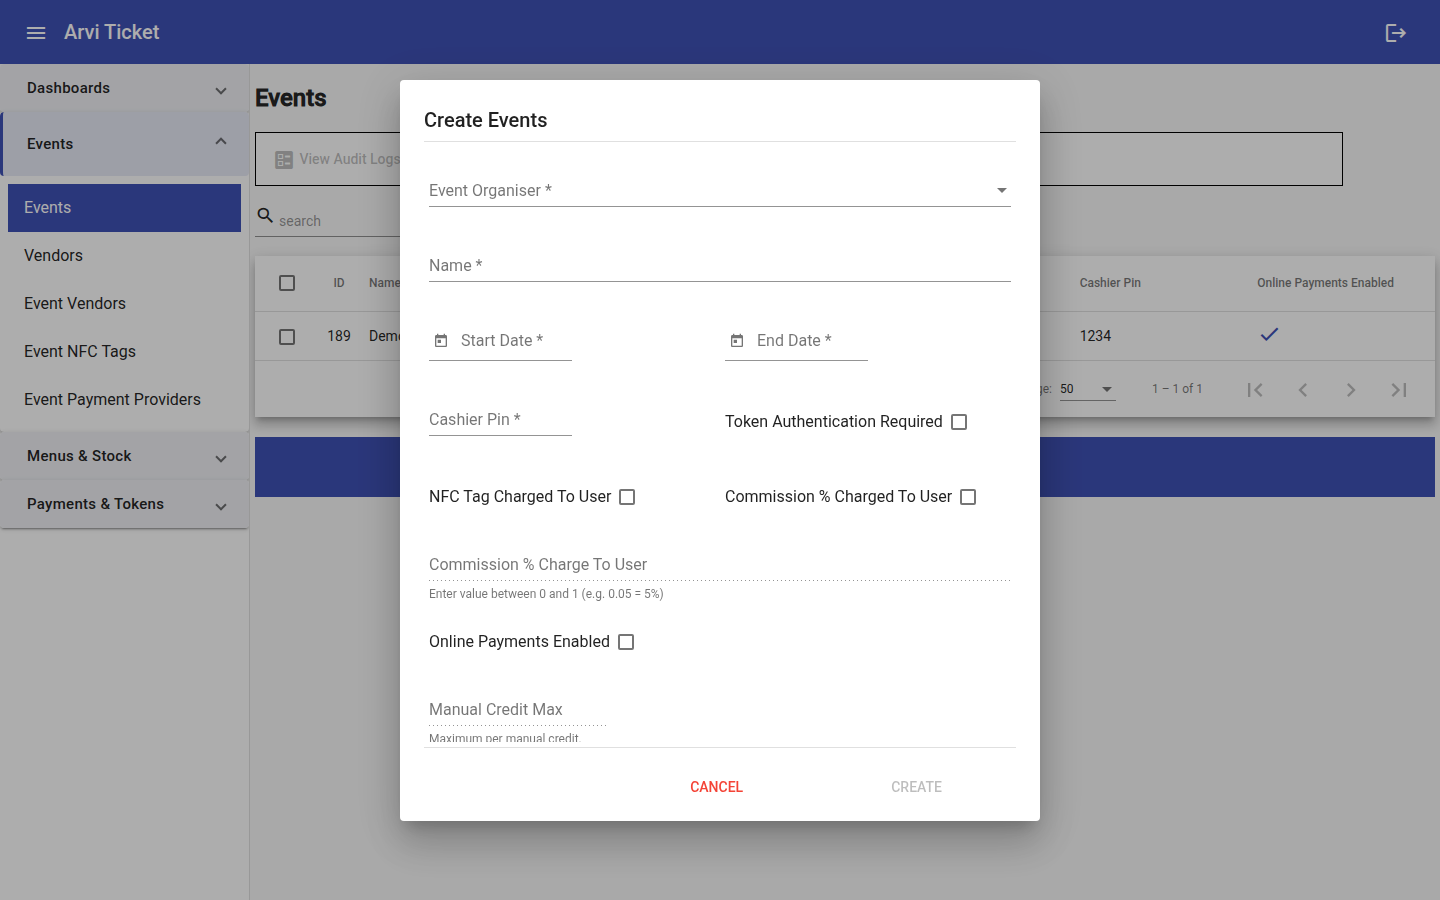
Open an event to reach its detail page, which has tabs for Details, Vendors (assign vendors to this event), and Payment Providers.
3.3. Vendors and Event Vendors
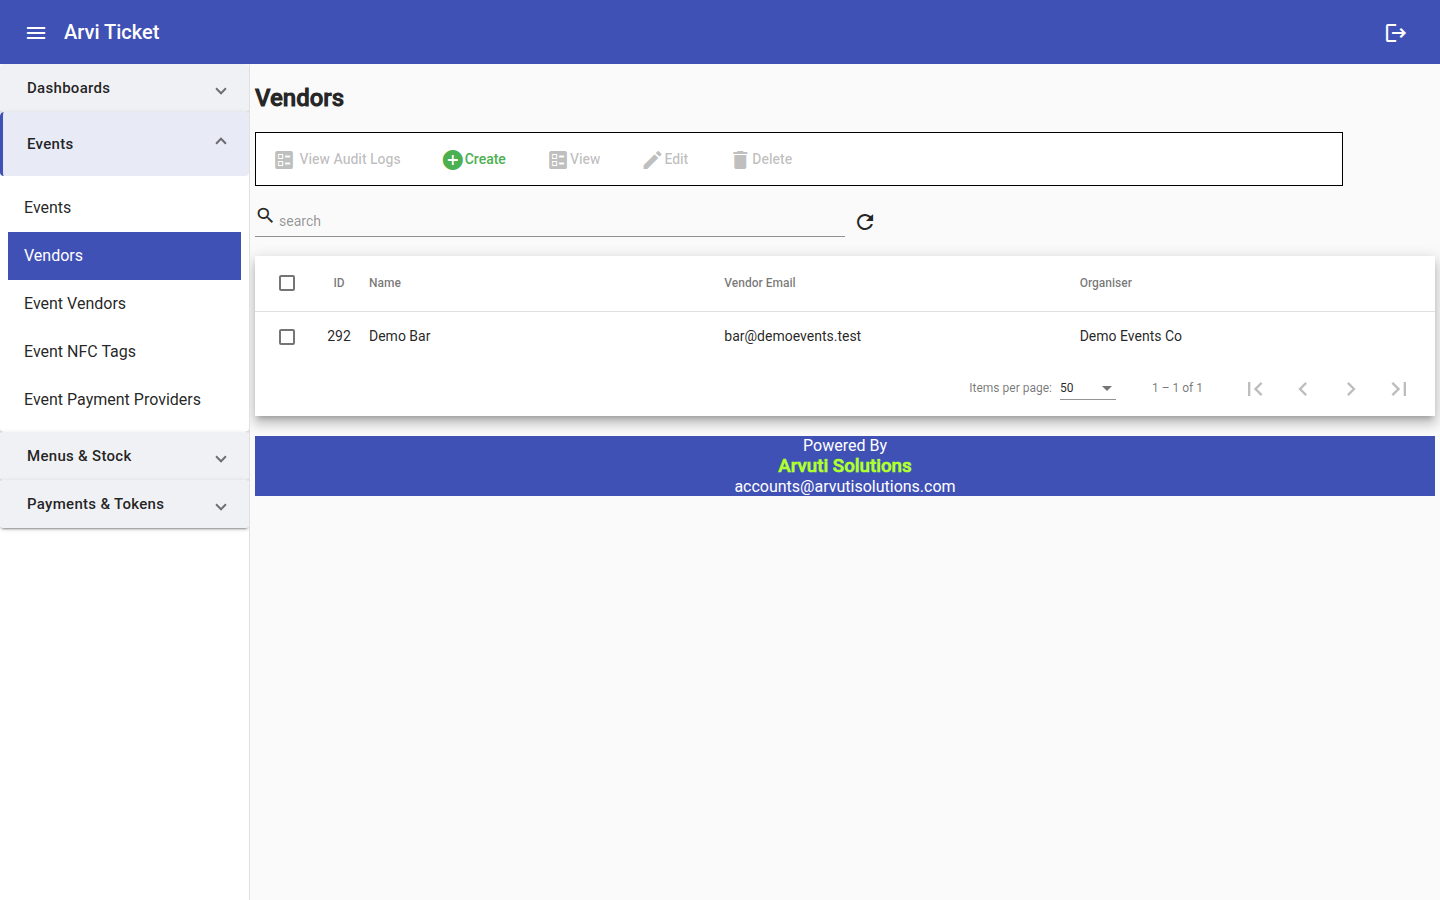
Vendors are your sellers (for example a specific bar). Create them under Vendors with a name and contact email; each vendor can own one or more menus.
Event Vendors is where a vendor is actually placed into an event — this is the central "who sells what, where" screen.
| A vendor cannot be added to an event until that vendor already has a menu. The Menu field is required, and the dropdown only offers menus belonging to the vendor you picked. So the order of work is: create the Vendor → build its Menu → create the Event Vendor. |
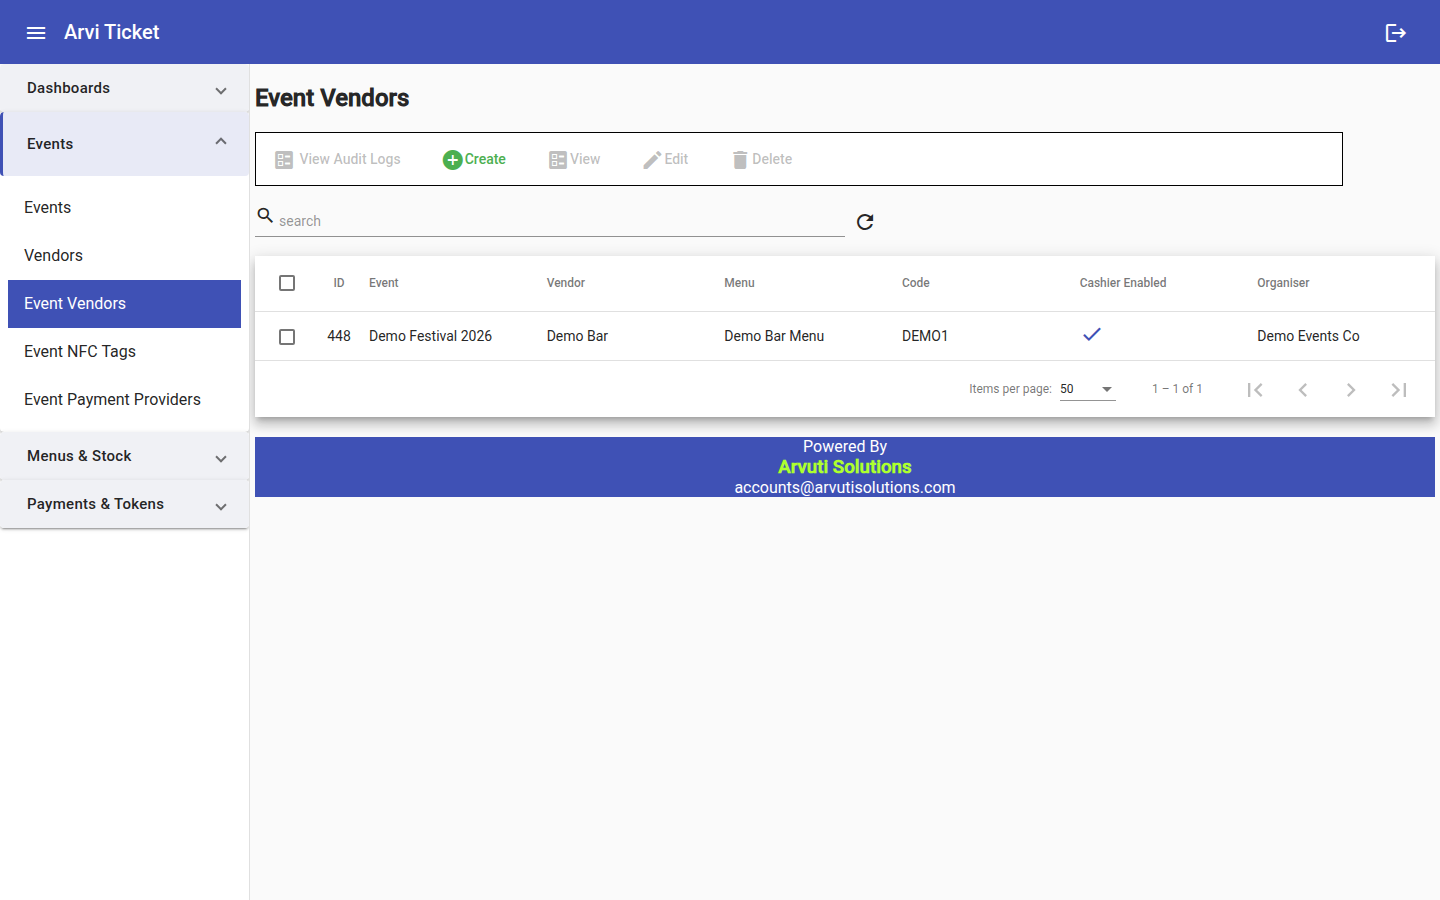
When you create an Event Vendor you set:
-
Event and Vendor — the pairing.
-
Menu — which menu that vendor sells from at this event (required; filtered to that vendor’s menus).
-
Cashier Enabled — whether this position can also run cashier top-ups.
-
Sales Type, Top Up Type, Discounts — the payment options available on the POS device.
The Code is not something you enter. The system generates a unique 5-character vendor code for each Event Vendor. Once the record is saved, read the code off the Event Vendors list and give it to the operator — it is what they type into the POS device to configure it for that stall.
3.4. Building menus
To open a menu for editing: go to Menus, select the menu’s row, click View, then choose the Menu Items tab. That opens the menu tree editor.
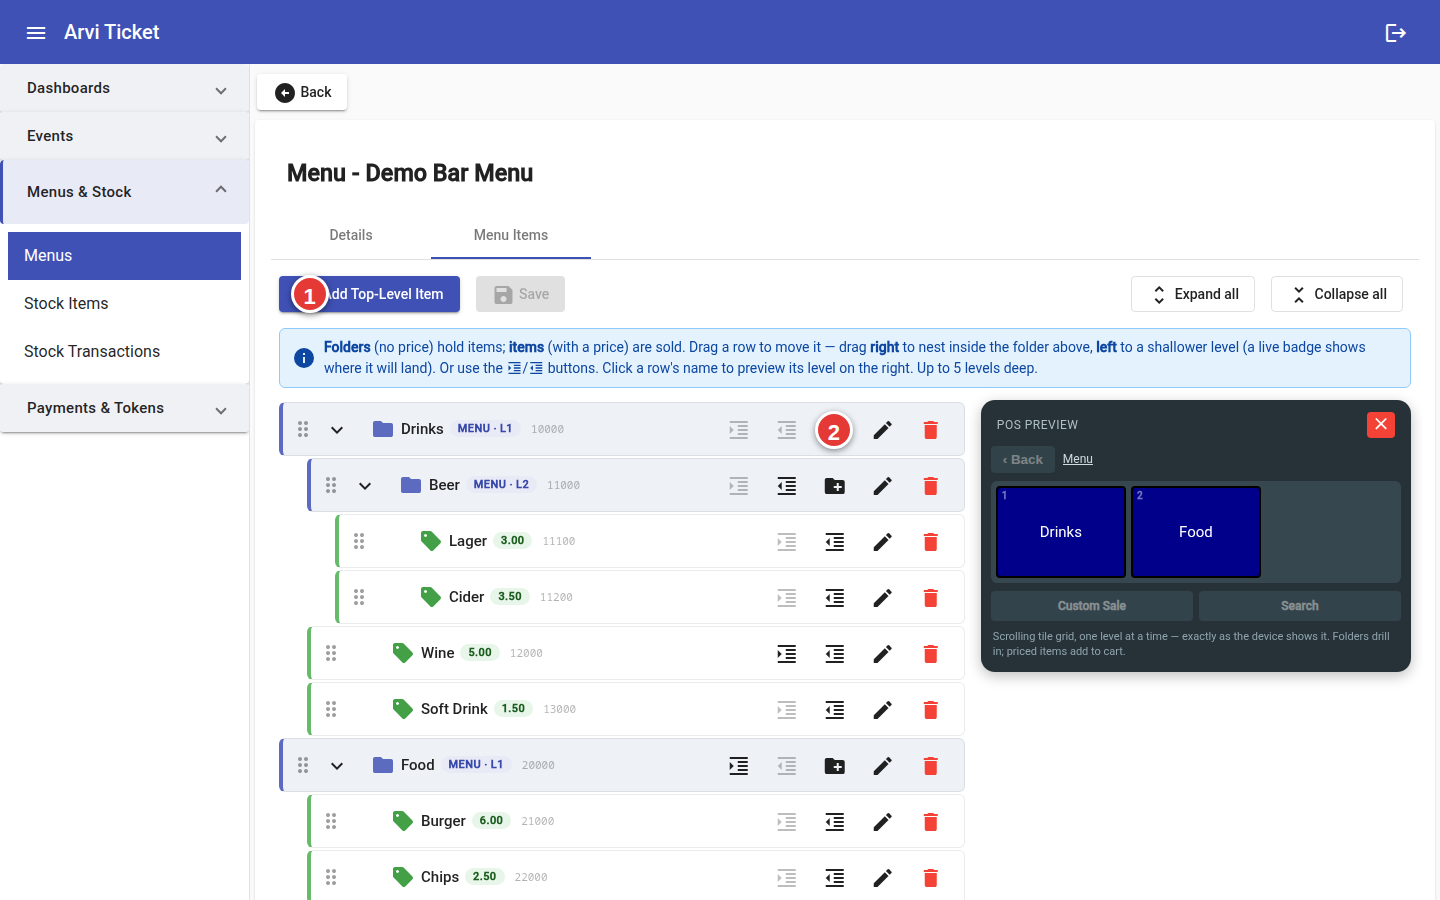
The menu is a tree:
-
Folders have no price and group items (for example "Drinks" > "Beer").
-
Items have a price and are what the cashier sells.
Adding rows
There are two different add buttons, and it matters which one you use:
| Button | What it adds |
|---|---|
Add Top-Level Item (in the toolbar) |
A new row at the root of the menu — a top-level folder or item. |
Add item inside this folder (the folder-plus icon on a row) |
A new row inside that folder. This icon only appears on folder rows. |
For each row you enter a Label, and — for a sellable item — a Price. Type the
price in full, for example 2.00 for two dollars (the field hint says "Enter the full
price (e.g. 1.50), not cents").
Arranging the tree
-
Use the indent icon to nest a row under the folder above it, and Move out one level to pull it back out.
-
You can also drag a row: drag it up/down to reorder, or right/left to change how deep it sits.
-
Expand every folder / Collapse every folder show or hide the whole tree.
-
Edit and Delete act on a single row.
| The editor shows a live POS preview — the dark panel on the right of the screenshot above — that mirrors the POS device screen, so you can confirm exactly how the menu will look to the cashier before saving. Folders drill in; priced items add to the cart, just as on the device. Click a row’s name to show that level in the preview. |
Saving
|
Nothing you change in the tree editor is saved until you click Save. There is currently no warning if you navigate away — switching tabs, using the sidebar, or hitting Back will silently discard every unsaved change. Always click Save before you leave the screen. |
Additional Menu Items
Below the tree there is a separate Additional Menu Items card. These items sit outside the tree — they have no place in the folder layout and are only reachable via Search on the POS device. Use them for occasional items you don’t want cluttering the menu grid. They have their own Add additional item, edit, and delete buttons.
3.5. Stock
If you track inventory:
-
Stock Items — the catalogue of stock items, each with a name, unit price, and vendor.
-
Stock Transactions — individual inventory movements (with a date, item, change amount, and reference).
-
Bulk create — add many stock adjustments at once, sharing one date and reference.
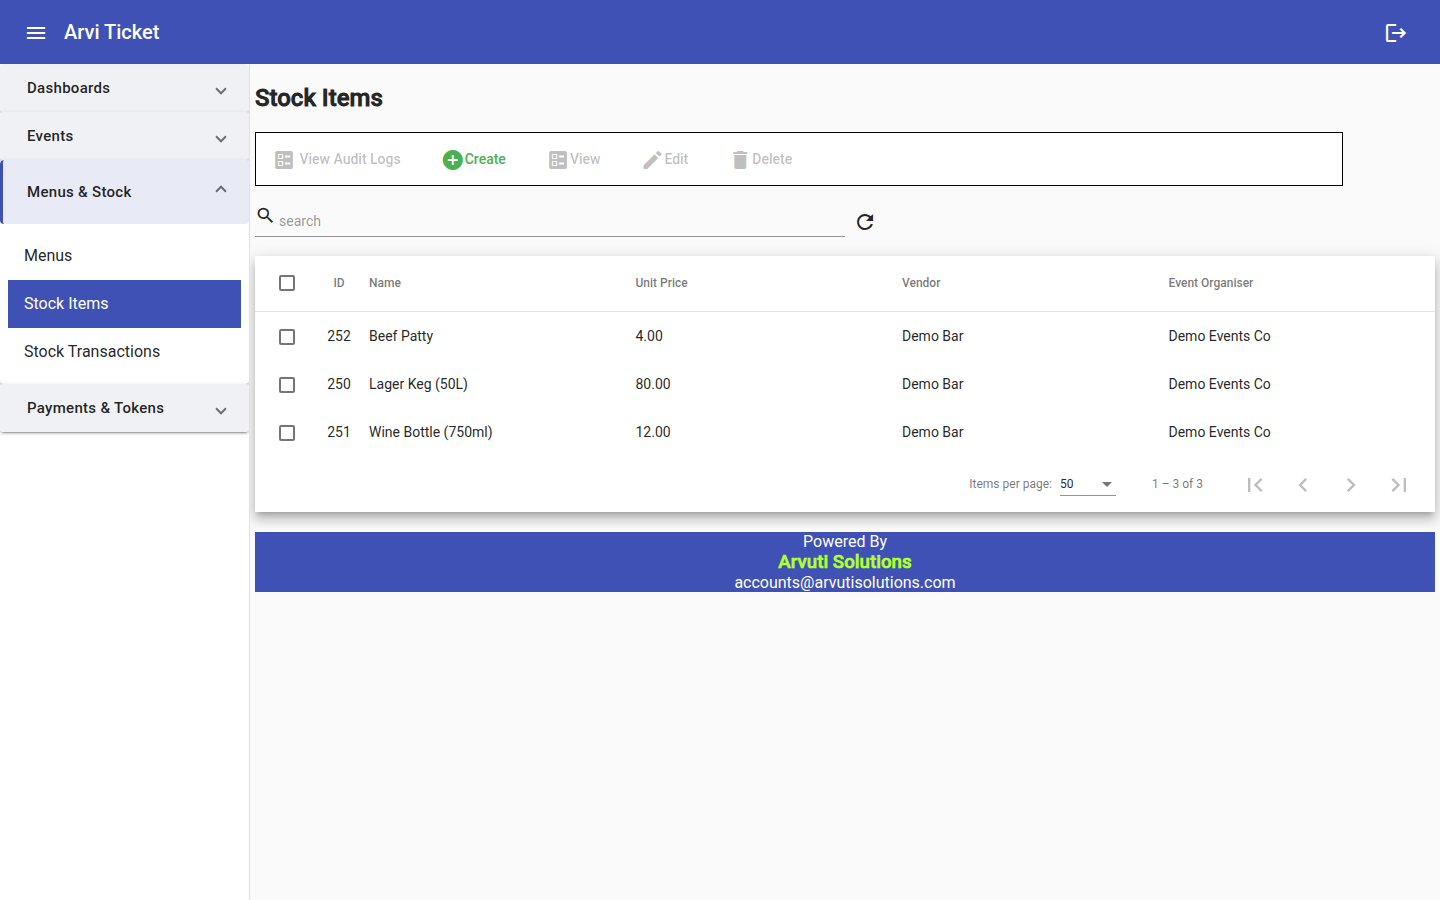
Multiple stock items can be linked to a single menu item to form a recipe: each linked stock item is deducted when one of those menu items is sold. For example, a "Burger" menu item might deduct one beef patty and one bread roll from stock on every sale.
3.6. Payments and tokens setup
Under Payments & Tokens you define the reusable options that appear at the POS device:
-
Sales Types — the named ways a sale can be paid (for example CASH, TOKEN).
-
Top Up Types — the named ways a top-up can be funded (for example CASH, CARD).
-
Payment Discounts — named percentage discounts a cashier can apply.
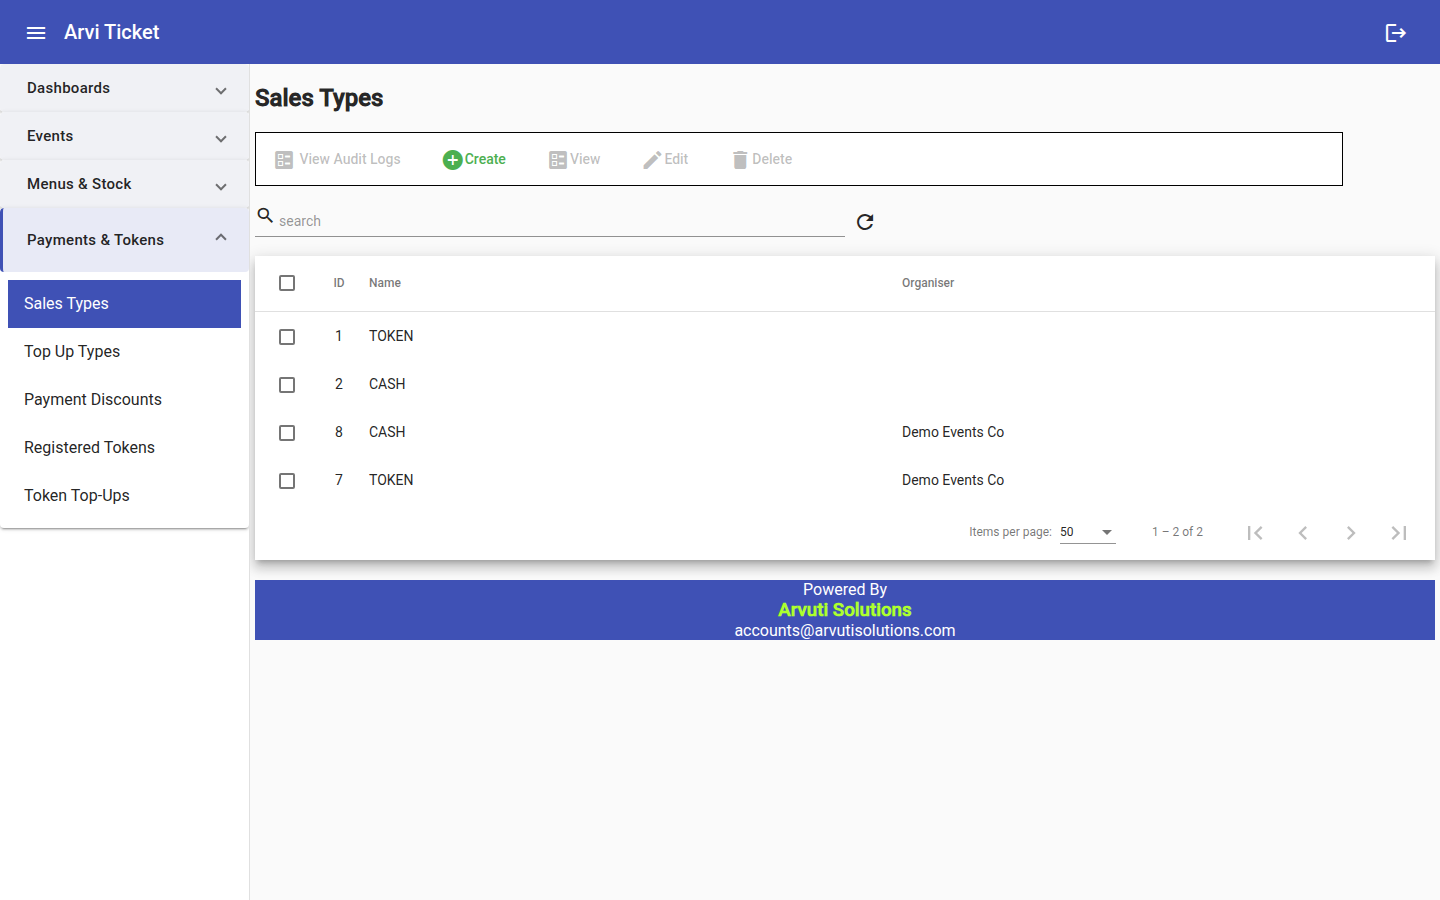
Two event-scoped settings live under Events:
-
Event NFC Tags — the tag types and their prices charged to attendees at top-up.
-
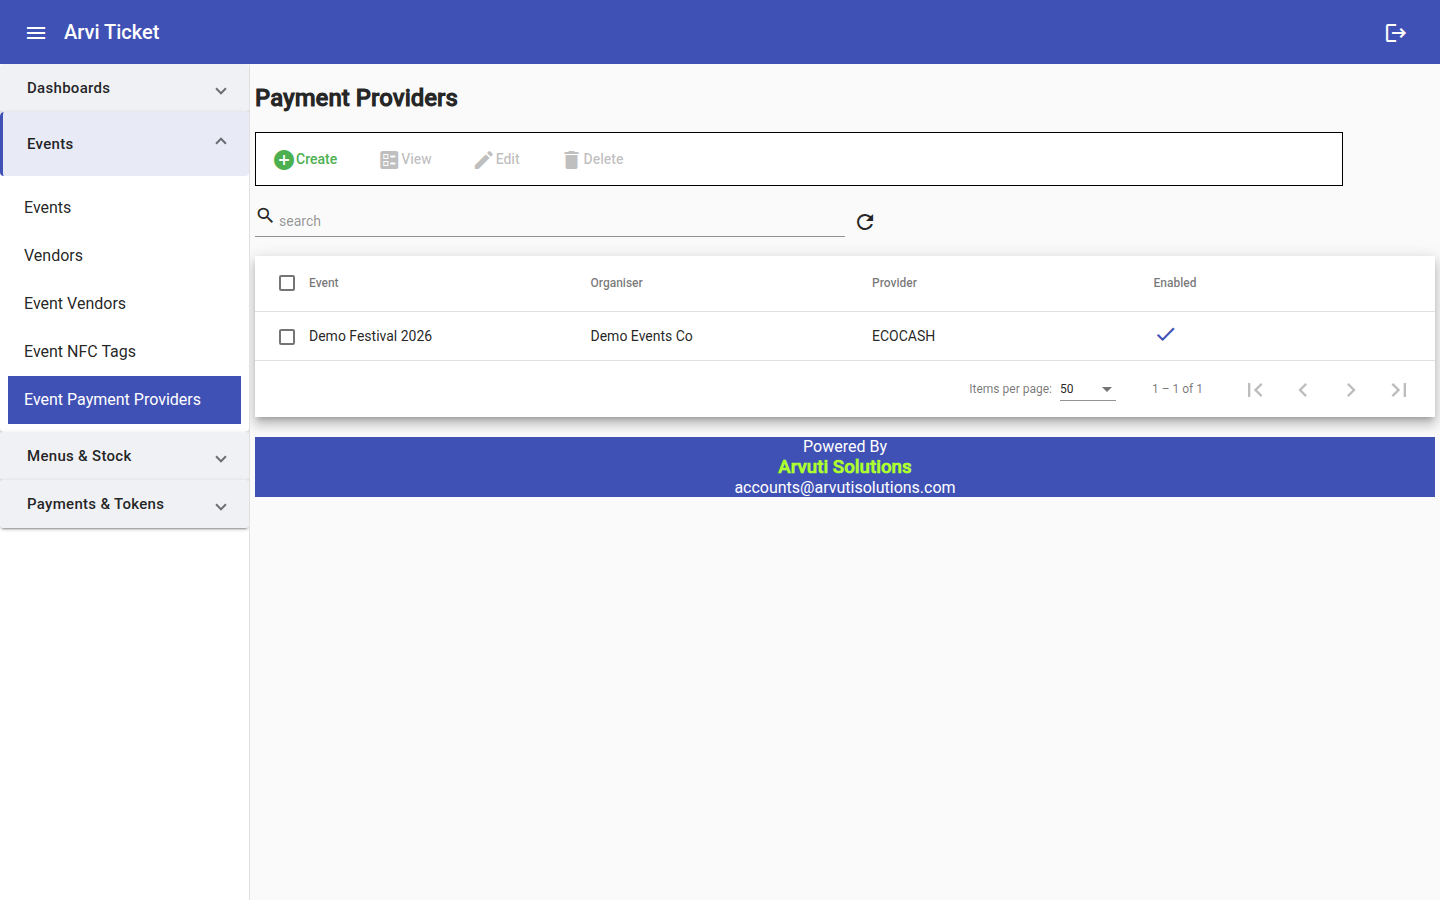
Event Payment Providers — the online payment integrations (PayNow, Omari, EcoCash) enabled for an event, with their credentials.
3.7. Managing tokens
Open Registered Tokens to see the register of NFC tokens and their holders.
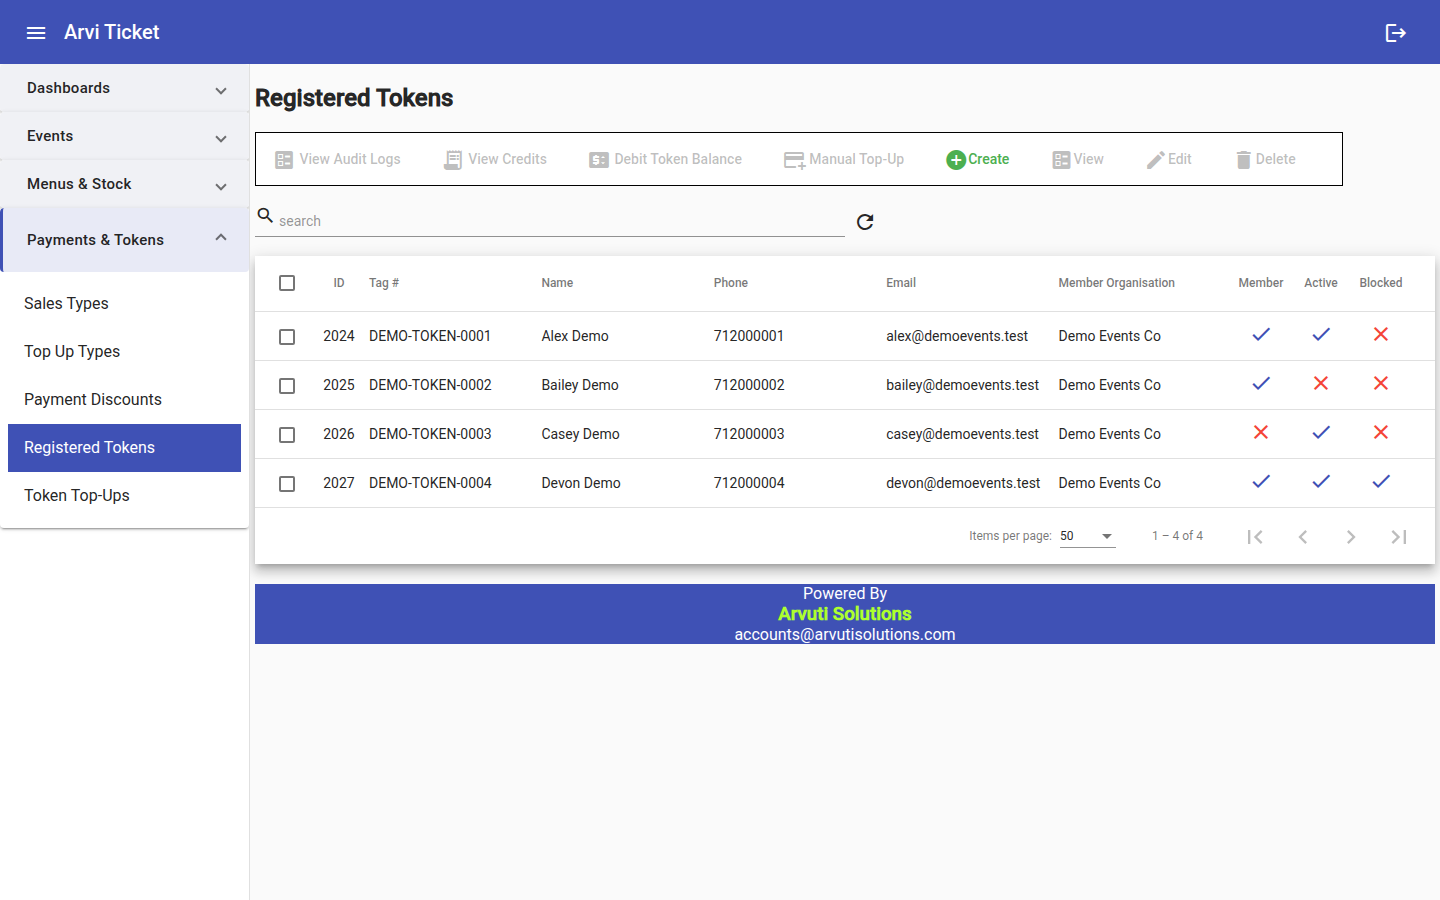
Each token row shows the Tag #, holder name, phone, email, member organisation, and the Member / Active / Blocked flags. With a token selected you can:
-
Manual Top-Up — queue credit for the token (see below).
-
Debit Token Balance — post an accounting correction (see below).
-
View Credits — see the pending/completed top-up credits for the token.
-
View Audit Logs — see the history of changes.
Manual Top-Up
Select the token, then click Manual Top-Up:
-
Choose the Event the credit belongs to. If the organiser only has one event, it is selected for you.
-
Enter the Top-Up Amount — in full units, e.g.
1.50. The maximum allowed comes from that event’s Manual Credit Max. -
Click Confirm.
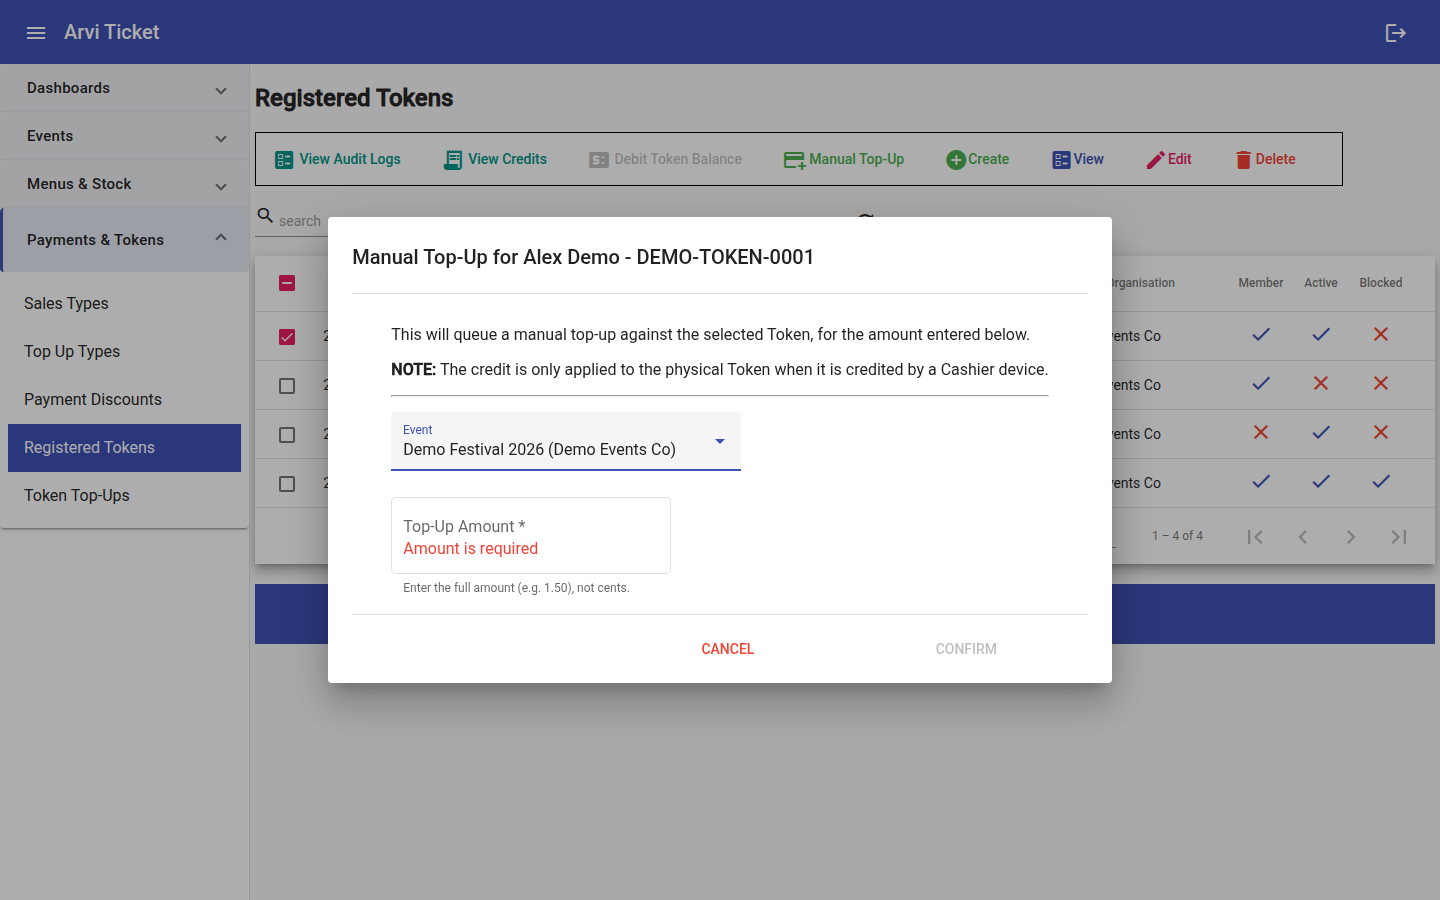
| A manual top-up is only queued. The credit is not on the attendee’s token yet — it is written to the physical token the next time it is presented to a Cashier POS device (via Fetch Token Credit). |
Debit Token Balance
This does not take money off the physical token. It records a negative "Cash Out" transaction so the reporting and accounting figures can be corrected — the balance still sitting on the chip is unchanged. The dialog says as much:
This will create a "Cash Out" Transaction against the selected Token, for the amount entered below. NOTE: This will NOT change the amount available on the physical Token! This is for correcting Reporting entries only.
| The Debit Token Balance button stays greyed out unless the selected token is Blocked. Block the token first if you need to make this correction. |
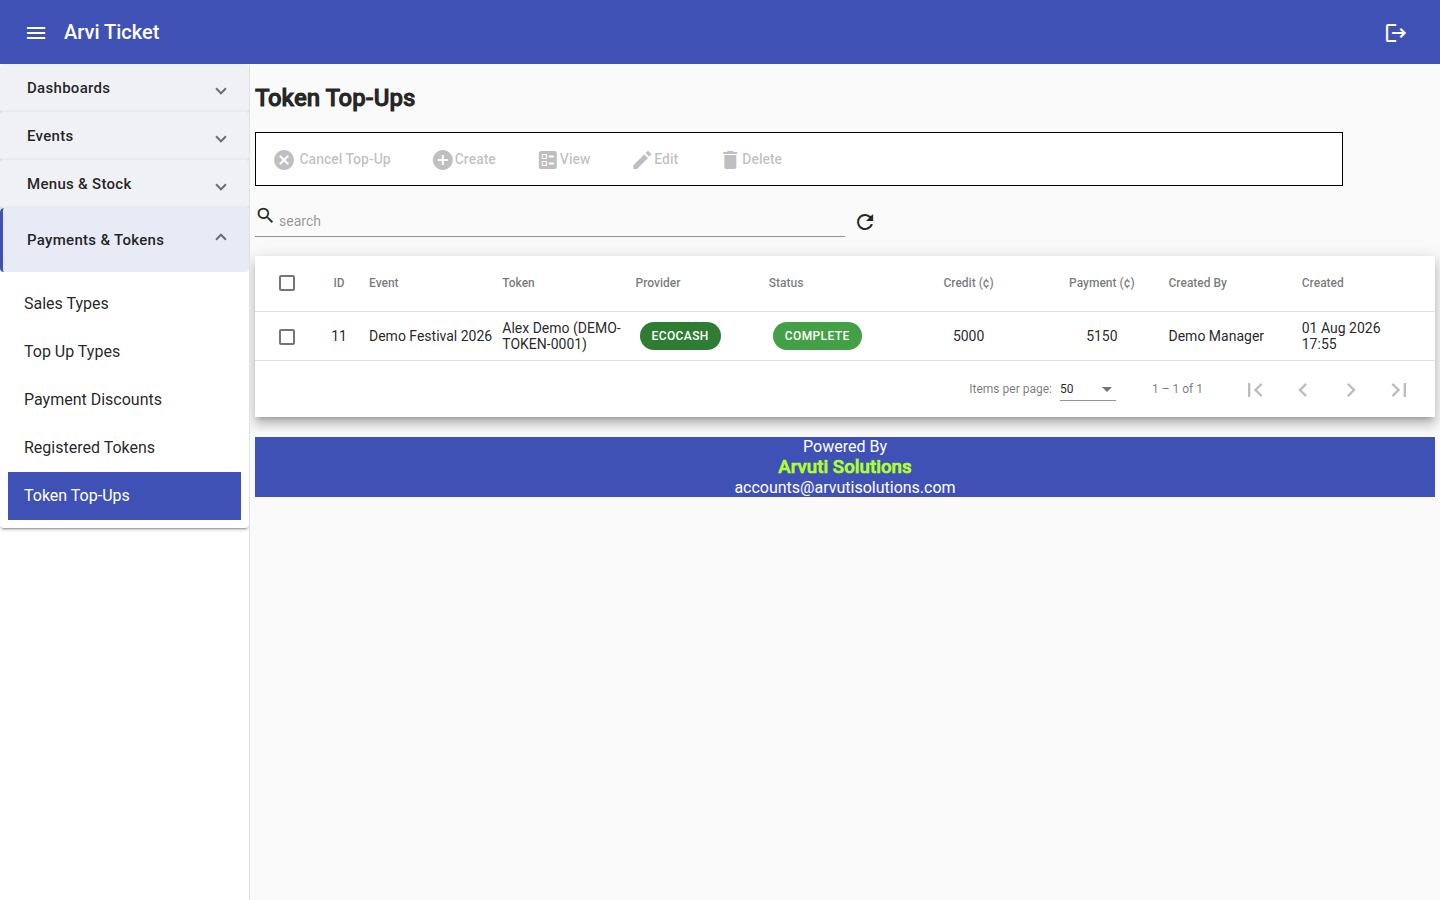
Token Top-Ups is the ledger of all top-up transactions — event, token, provider, status, amounts, who created it, and references. Select a pending row and use Cancel Top-Up to cancel it.
3.8. Running reports
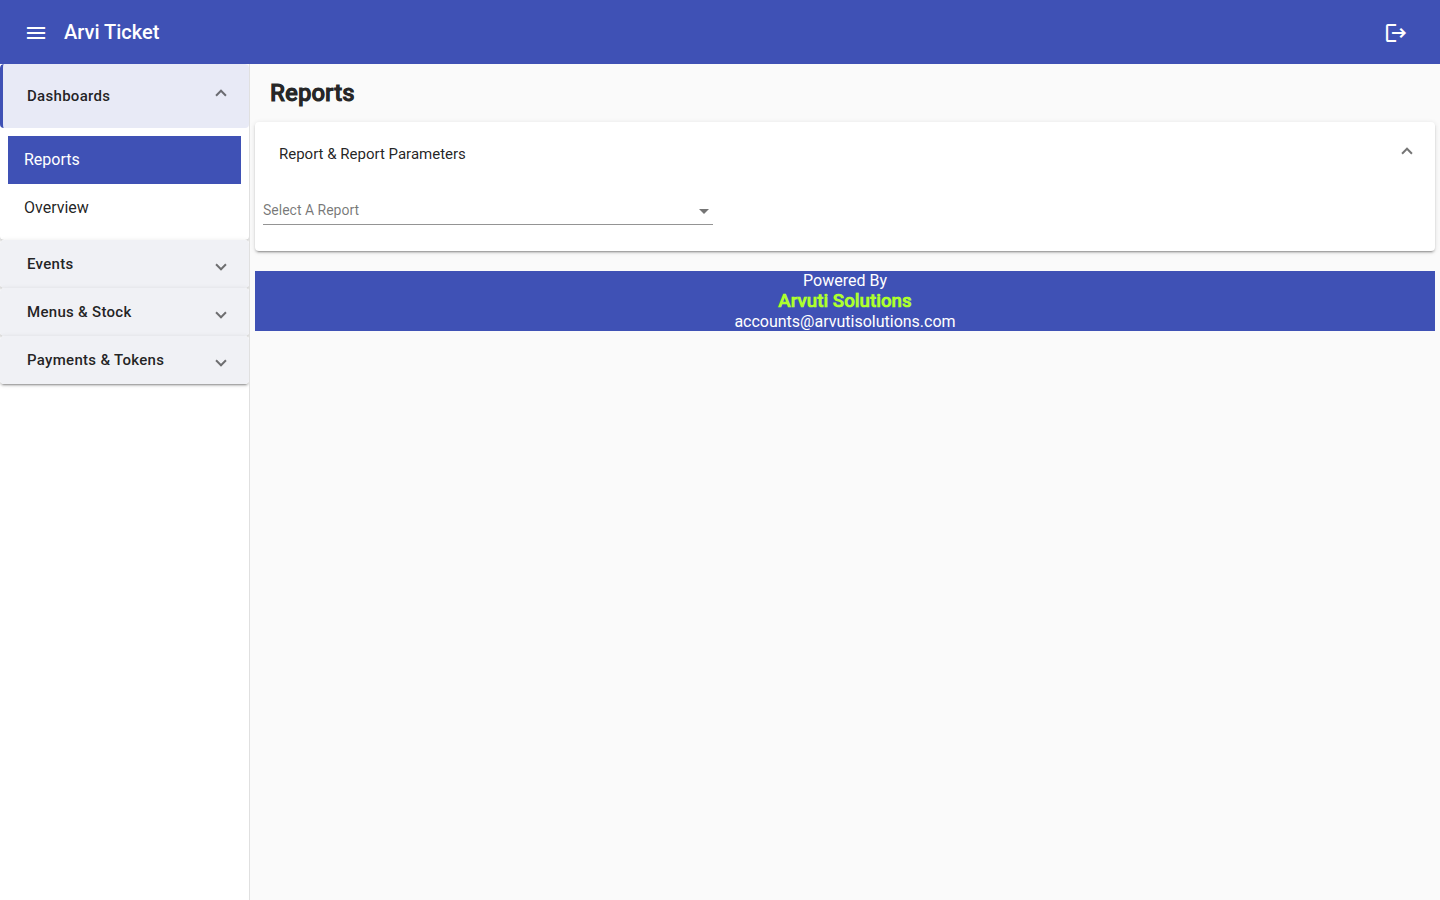
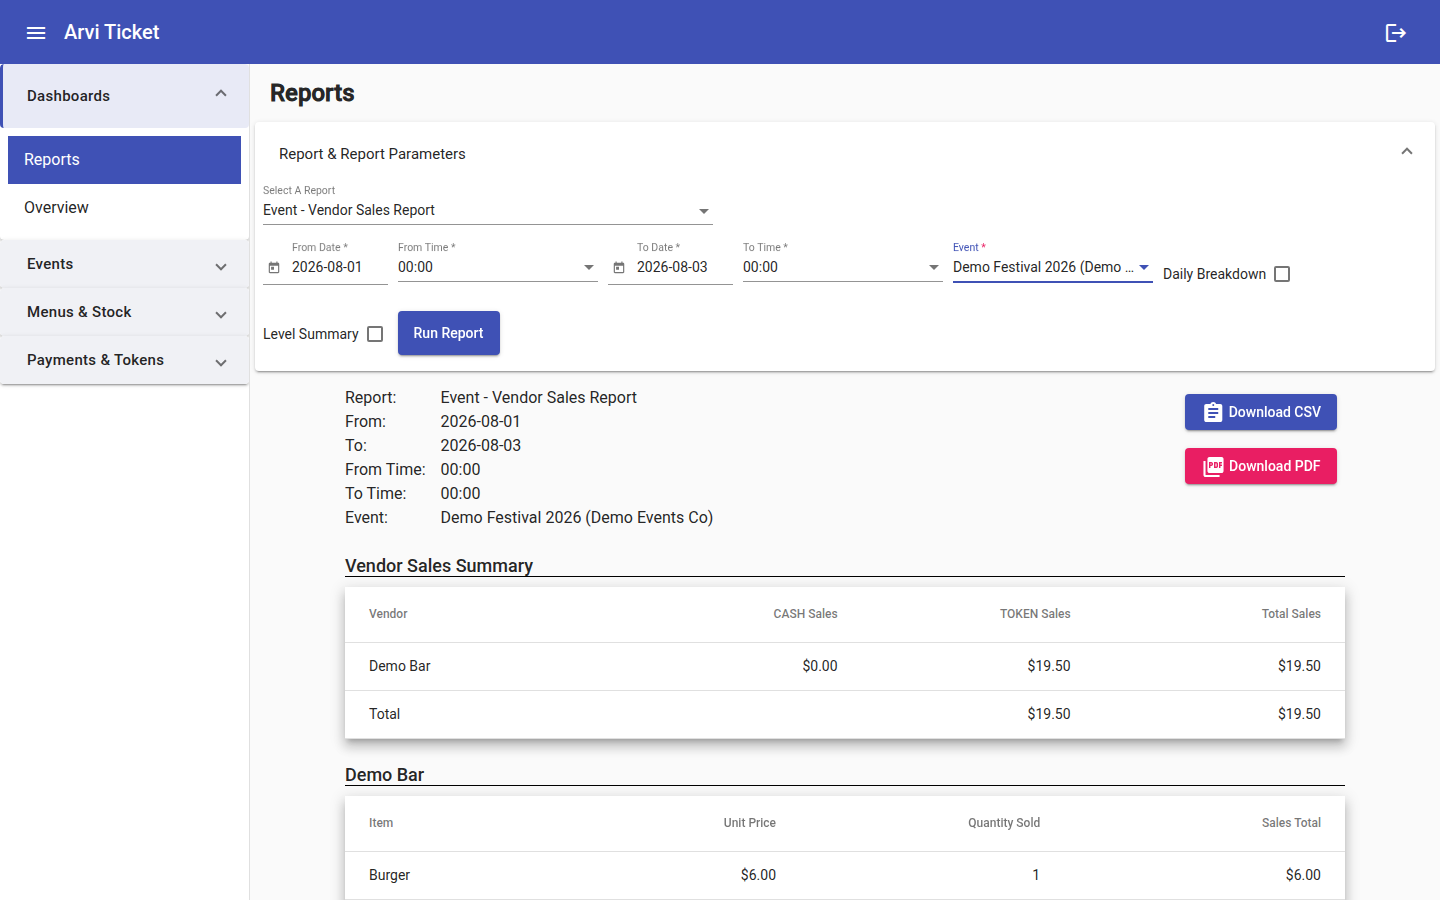
Open Reports. Pick a report from the dropdown, fill in its parameters (date ranges and event / vendor filters), and load it.
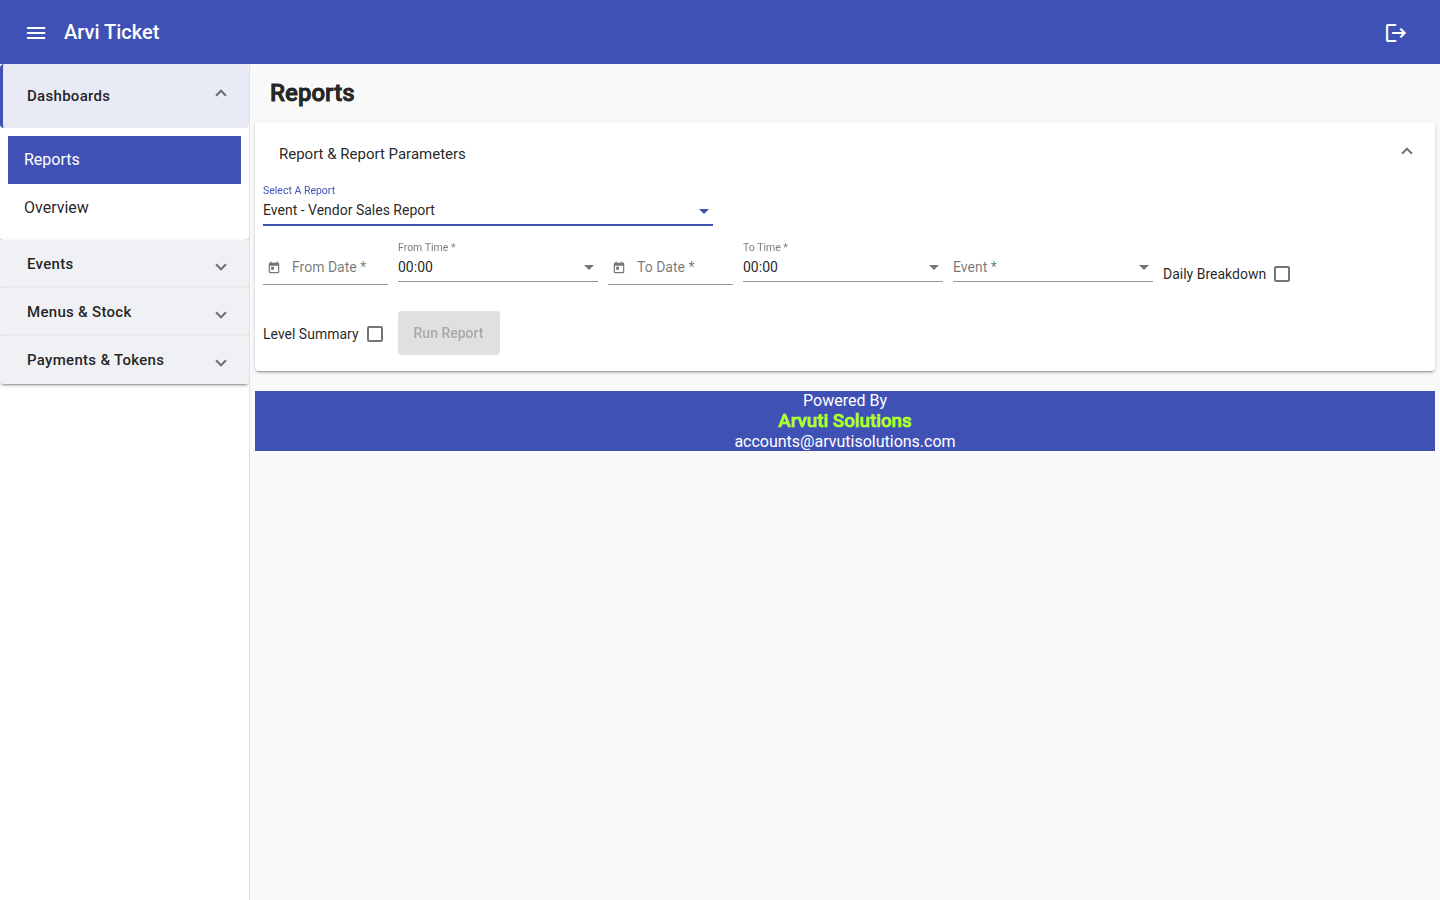
Reports available to event managers:
| Report | Shows |
|---|---|
Event – Vendor Sales Report |
Sales totals per vendor for an event. |
Event – Vendor Transactions Report |
Individual transactions per vendor. |
Event – Cashier Transaction Report |
Transactions and amounts by cashier. |
Event – Token Balances Report |
Outstanding balances still held on tokens. |
User – Token Transaction & Balance Report |
Per-token transaction history and balance. |
Event – Device Sync Report |
POS device sync status and activity. |
Stock – Inventory Report |
Current stock levels. |
Stock – Inventory Transactions Report |
Stock movement history. |
The Overview dashboard lets you select your organiser and view its account statement over a date range.
4. Cardholder guide
This short guide is for attendees — the people carrying an Arviticket token. It covers the self-service web portal you reach by scanning the QR code on your token, where you can check your balance, review your purchases, register your token to yourself, and set a PIN.
| You don’t log in. Each screen opens straight from the QR code / link on your token, which already identifies it — so anyone with the token can see its balance. |
4.1. Checking your balance and transactions
Scan the QR code on your token (or open the link you were given). The Balance & Transactions screen opens.
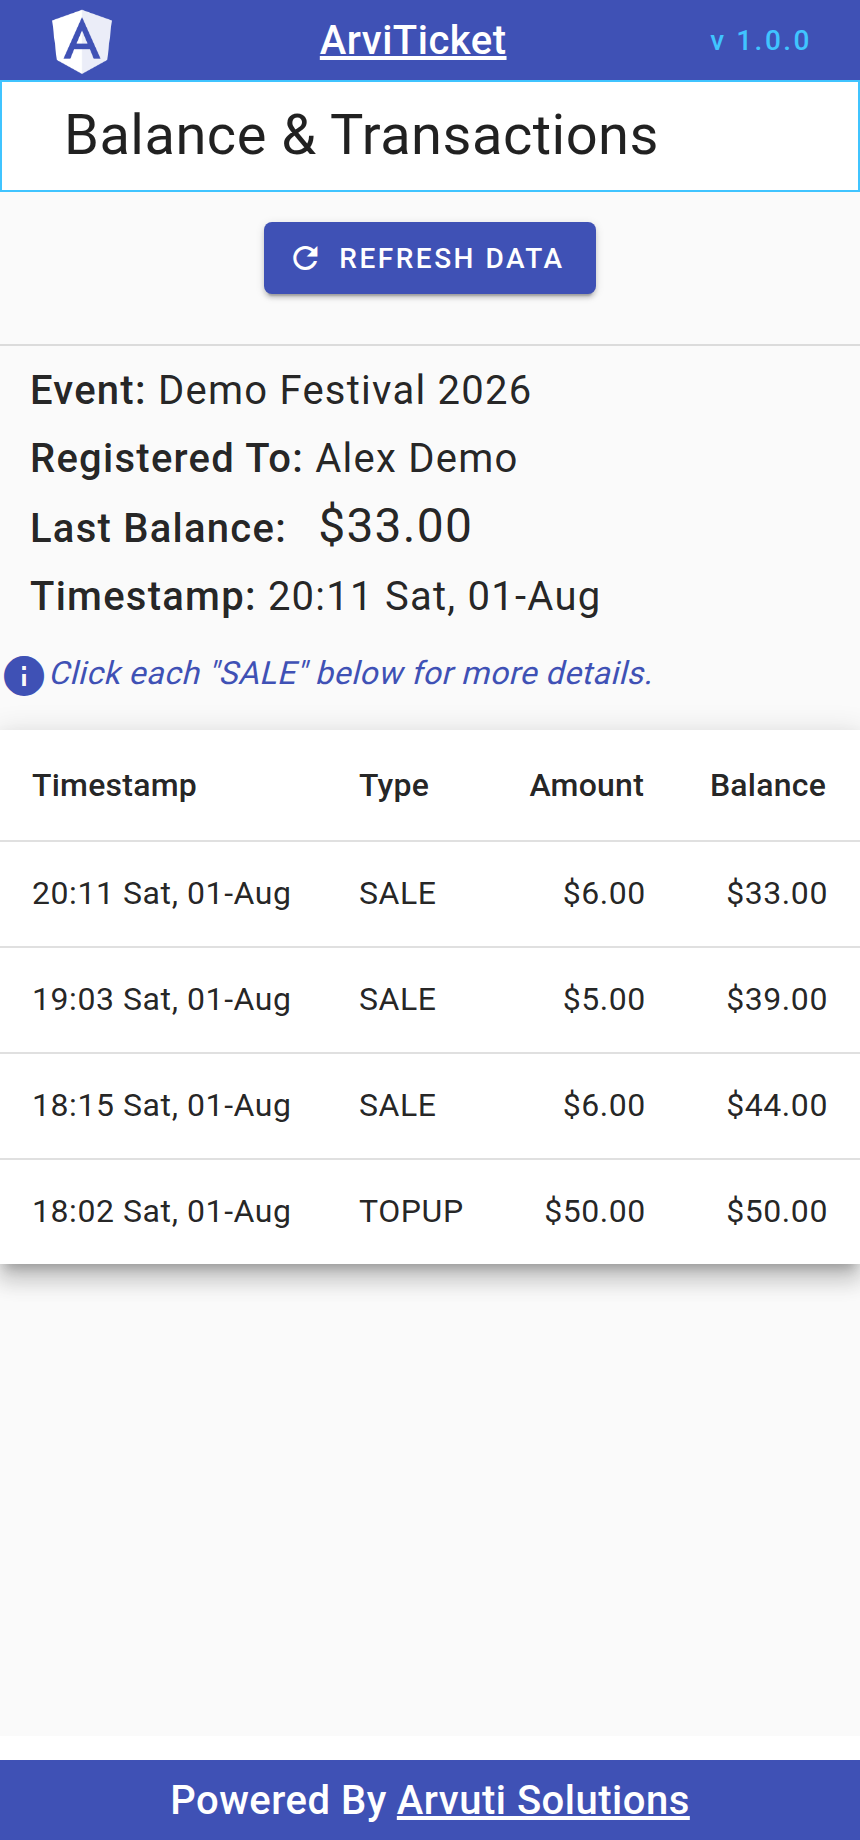
It shows:
-
Event — the event your token belongs to.
-
Registered To — your name, if the token has been registered (otherwise "n/a").
-
Last Balance — the most recent balance recorded for the token, with its timestamp.
-
A table of transactions — each top-up and sale, with its time, type, amount, and the running balance.
Tap REFRESH DATA to pull the latest figures.
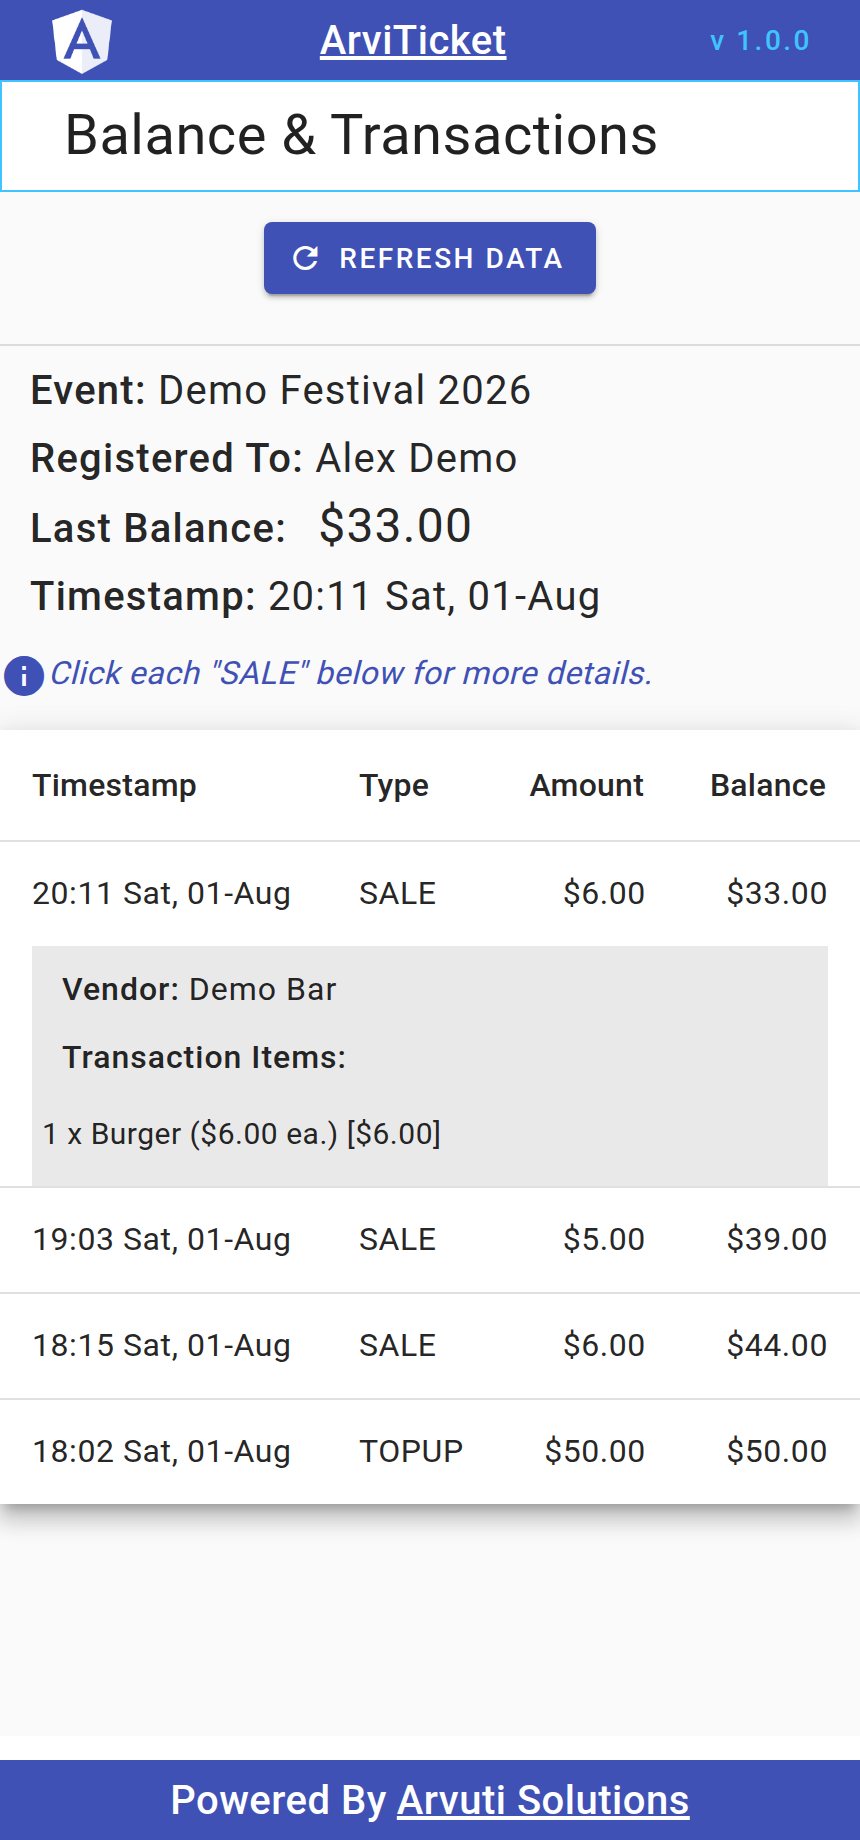
Tap any SALE row to expand it and see the vendor and the individual items you bought.
| The balance shown here is the last balance the system recorded. Because the authoritative balance lives on the token’s chip and updates offline at the POS device, the most up-to-date figure is always the one on the token itself. |
4.2. Registering your token to yourself
Registering a token links it to your name and contact details, so staff can recognise it and you can protect it with a PIN.
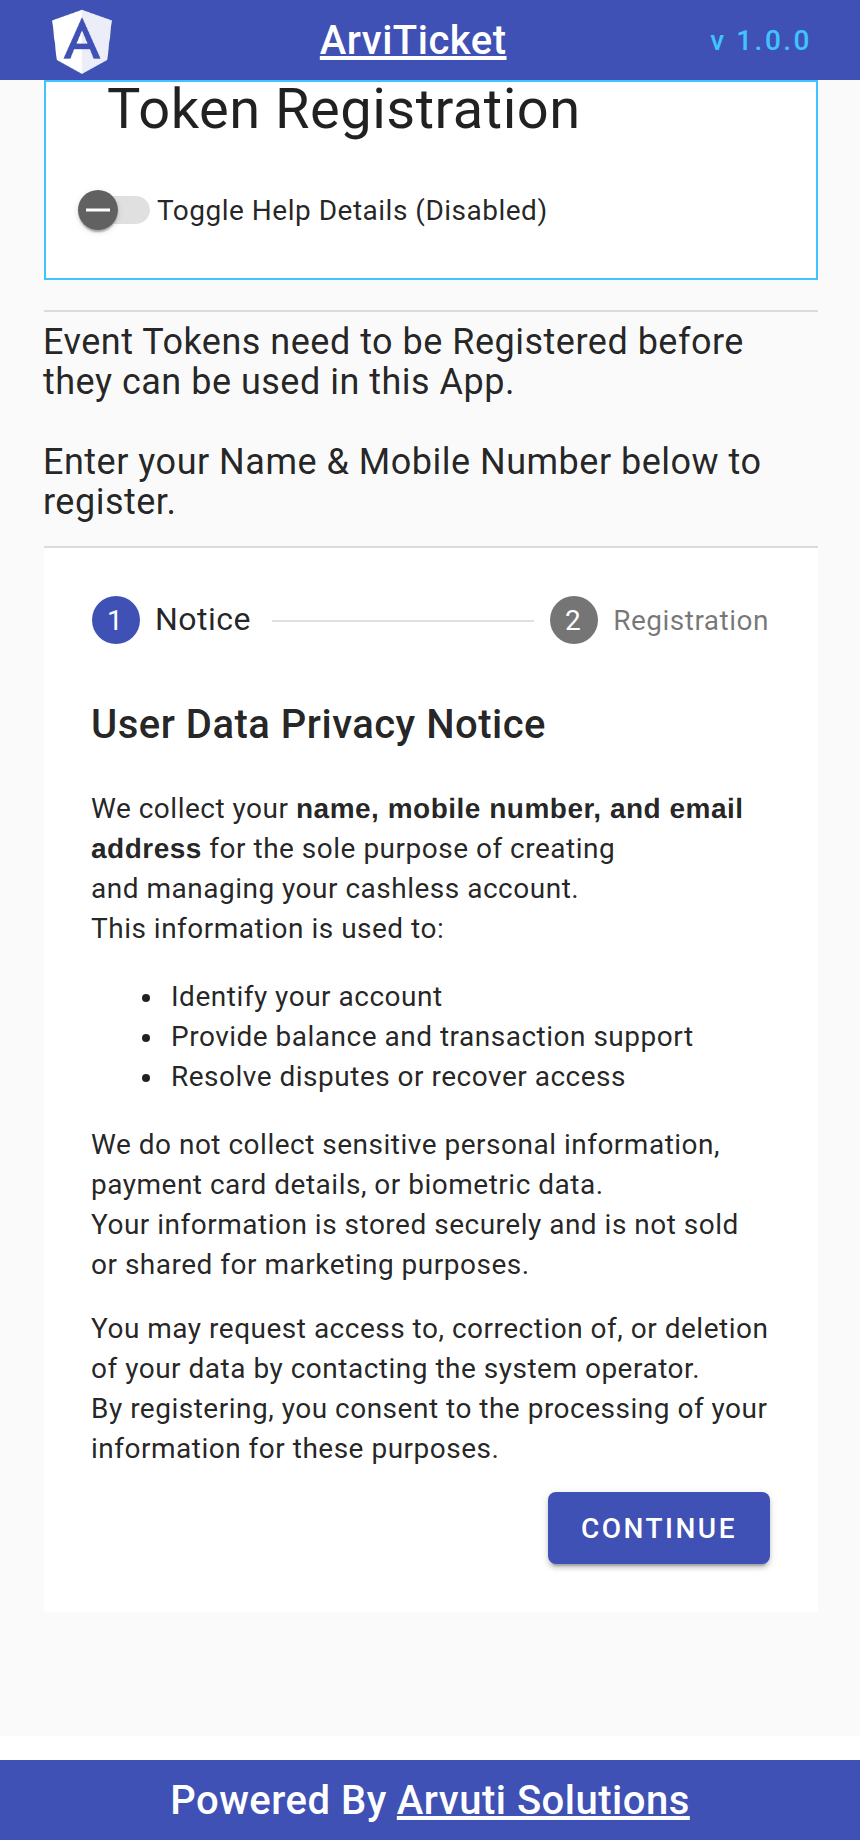
Fill in:
-
Name
-
Country Code and Mobile No. (excluding the country code)
-
Email (optional)
-
PIN and Confirm Token PIN (optional) — set one if you want your token protected
The Token field is shown read-only — it’s your token’s ID and can’t be changed.
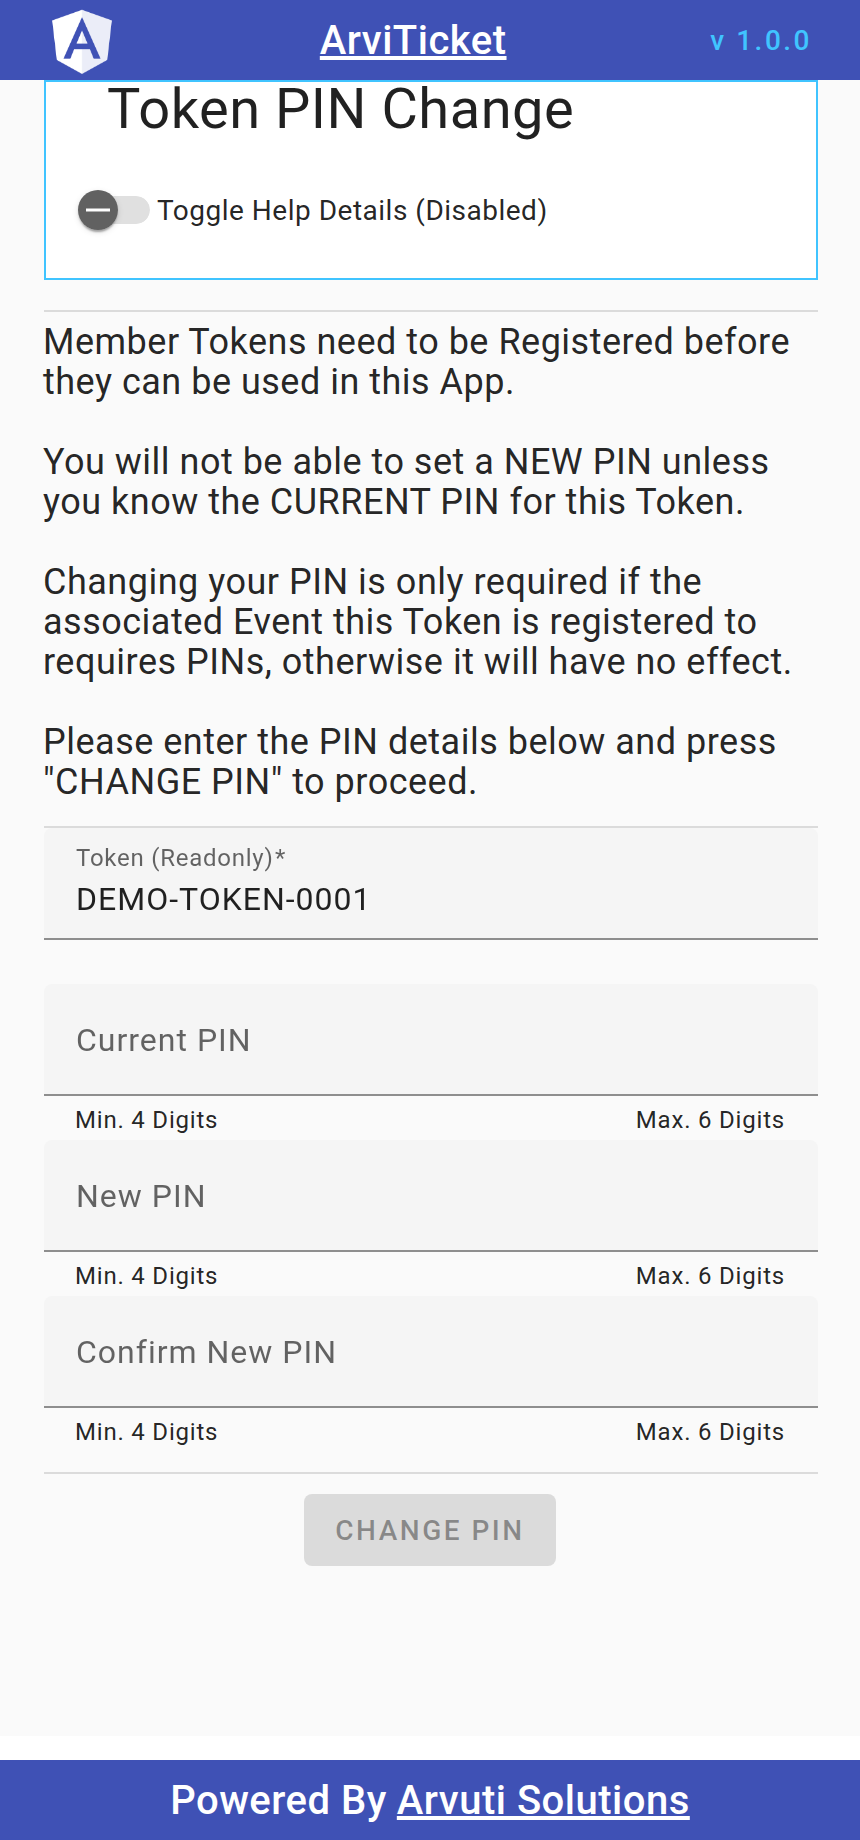
4.3. Changing your PIN
If your token has a PIN, you can change it from the PIN change screen (reached from your token’s link). Enter your new PIN and confirm it.
4.4. Topping up
Credit is added to your token at a cashier desk (cash or card) or, where the event supports it, through an online payment. Once a top-up is loaded onto your token, it appears in your transaction list here.
| This portal is for viewing your token and managing your details — it does not take payments. To add credit, visit a cashier or use the online payment link provided for your event. |